
When I started engraving wood with my CNC a few months ago, I was a bit intimidated by all the different engraving bits to choose from and I did not know where to start. The bits themselves are fairly inexpensive, at less than $1 a piece for a simple 1/8” diameter uncoated bit.
But rather than force you to buy them all or figure it out all on your own, this post shares a few of my learnings about bit geometry so you can save some time and money. And a little warning: since we are indeed talking about geometry, we will get into a little basic trigonometry and algebra as well.
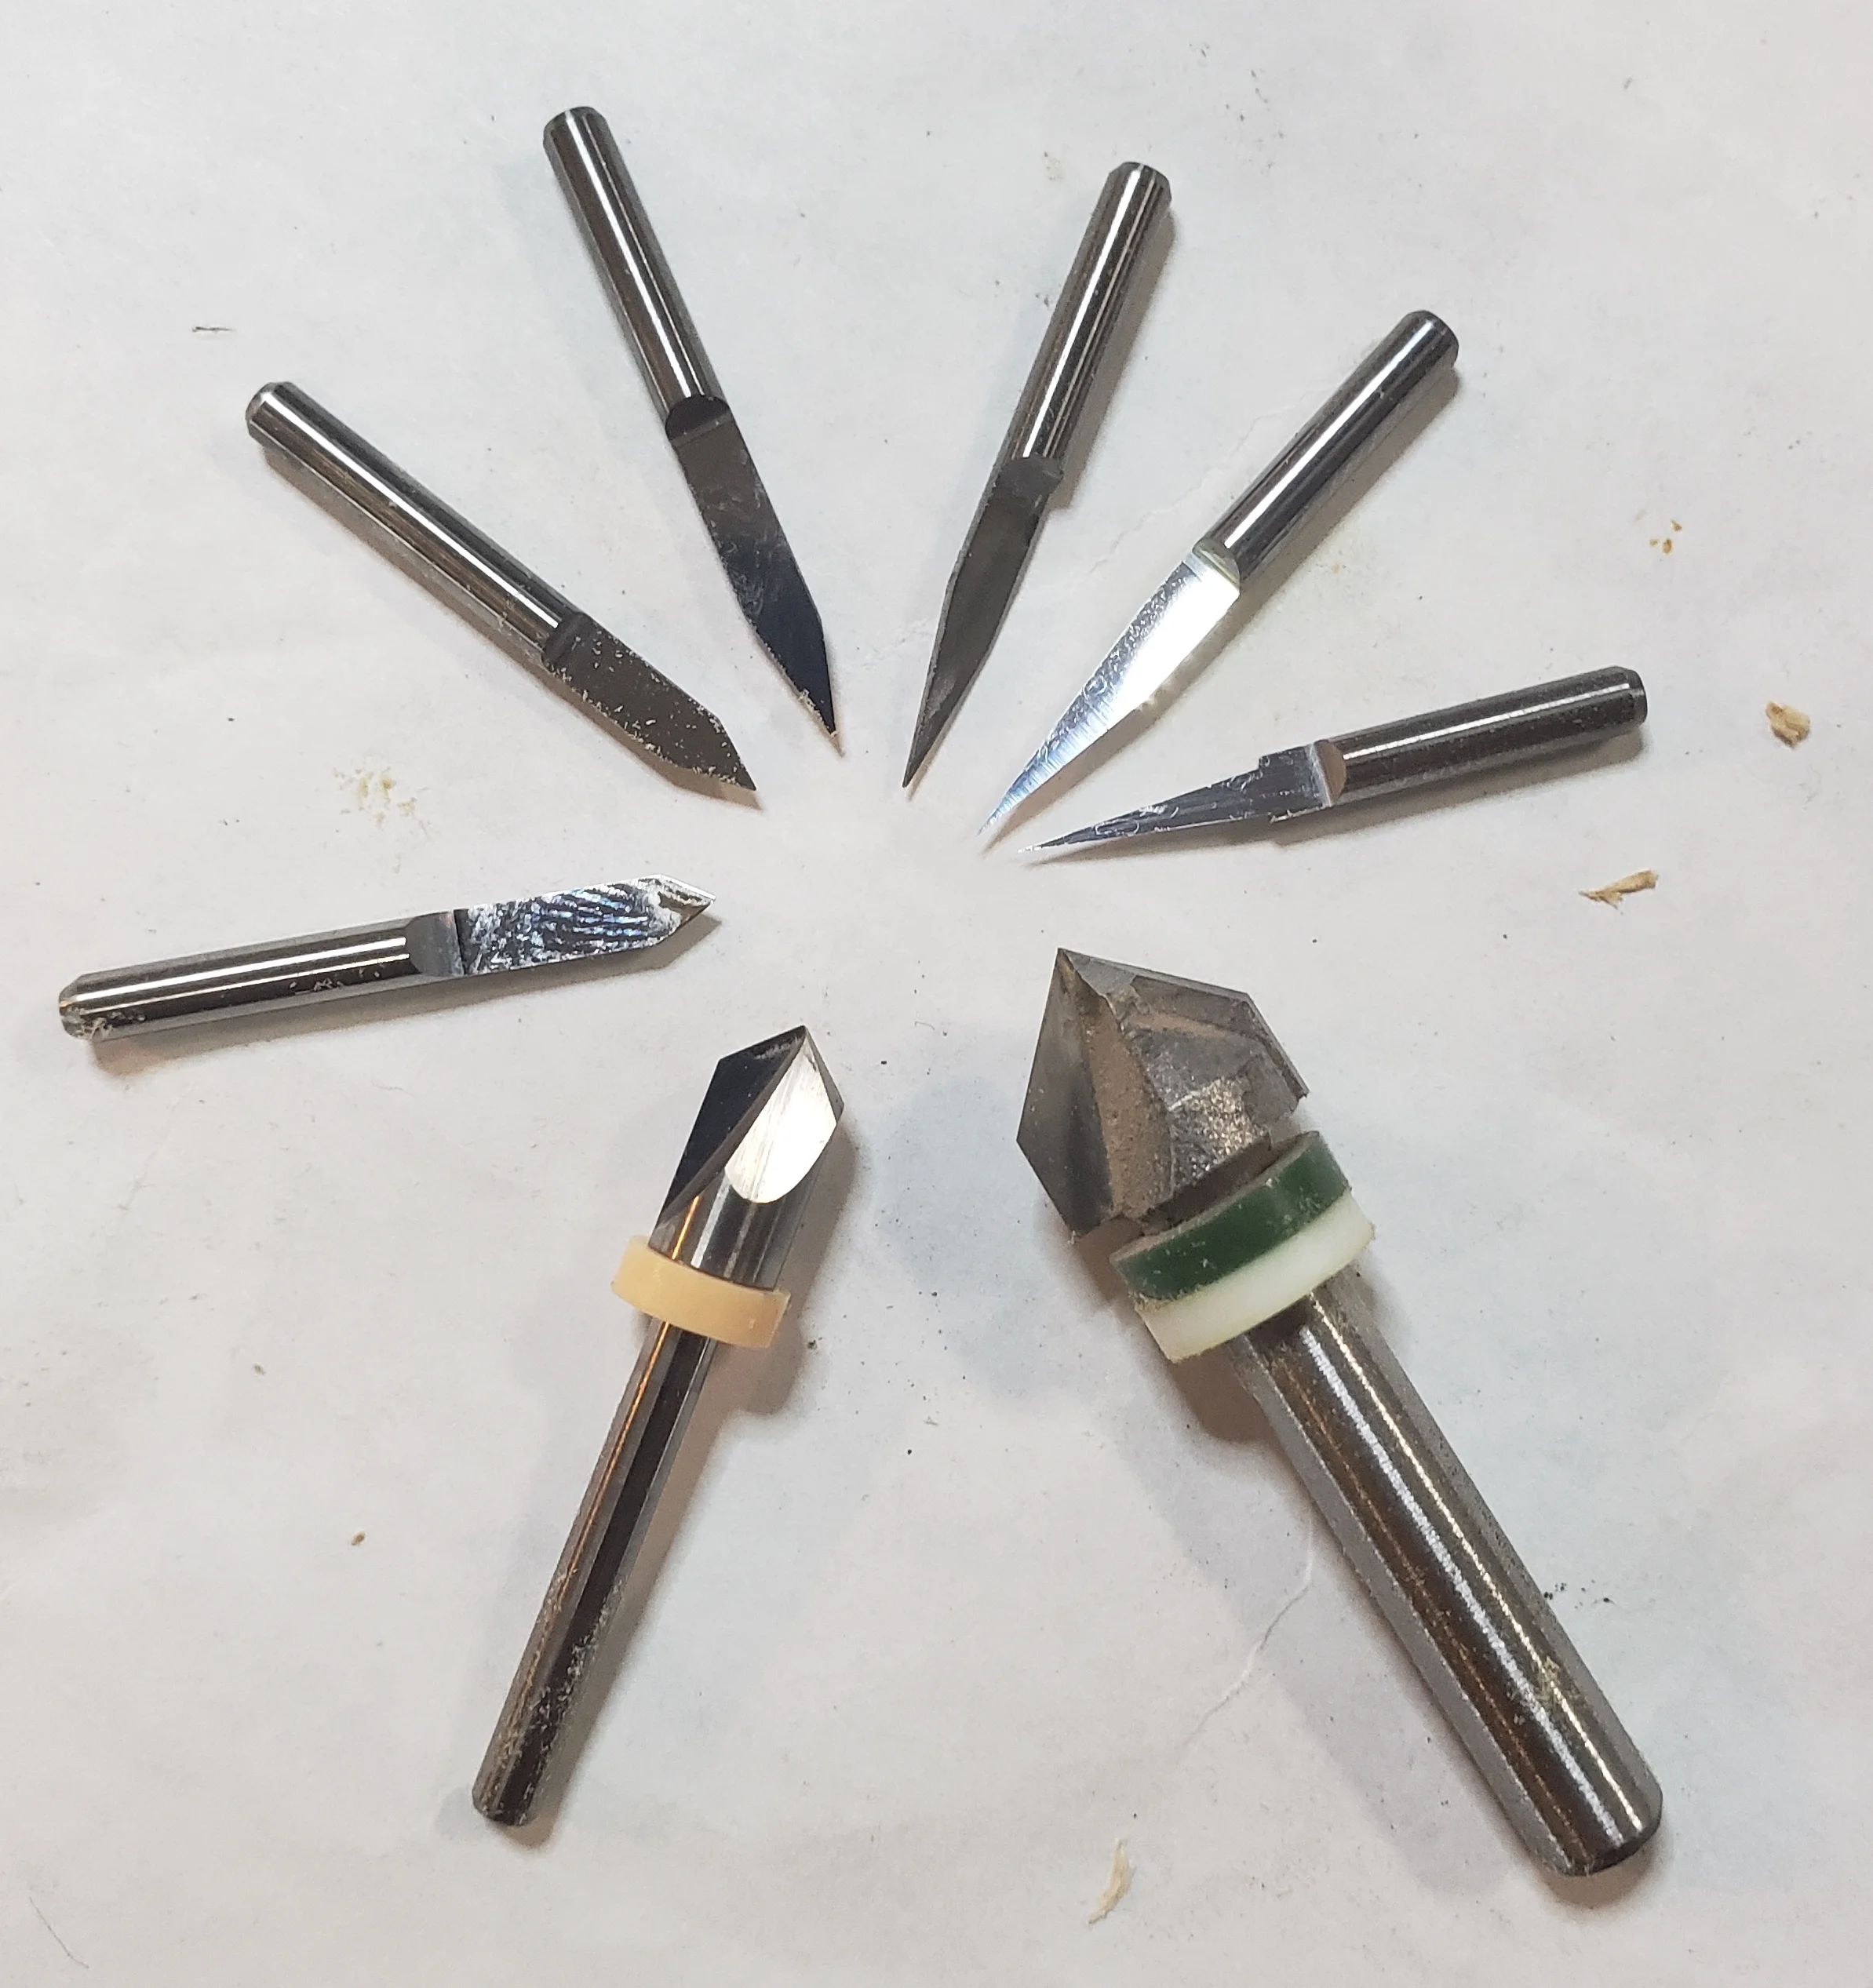
Starting with the small bit at the 3 o’clock position and going counterclockwise, the total angle of these bits are 5, 10, 20, 30, 45, 60, and - with the two bigger bits - 90 & 90 degrees; the taper angle is half of the total angle. The first six all have a defined tip diameter of 0.1mm (= 1/250”), while the two larger bits don’t have a tip diameter defined (but 0 or 0.1mm could be used). The total diameter of the second-through-sixth is 1/8”; the two bigger ones are 1/4” and 1/2” diameter. But look carefully: the first bit has a total diameter of about 3/32”; plunging deeper (or defining it as 1/8” in software) could cause some unexpected results!
Diameters and Angles
Fusion360 - my CNC software of choice - provides a lot of flexibility in specifying the bit geometry, and it also does a good job displaying the bit as-entered in the live-updated image on the right hand side of this pane, so that you can quickly see any obvious errors in the settings.
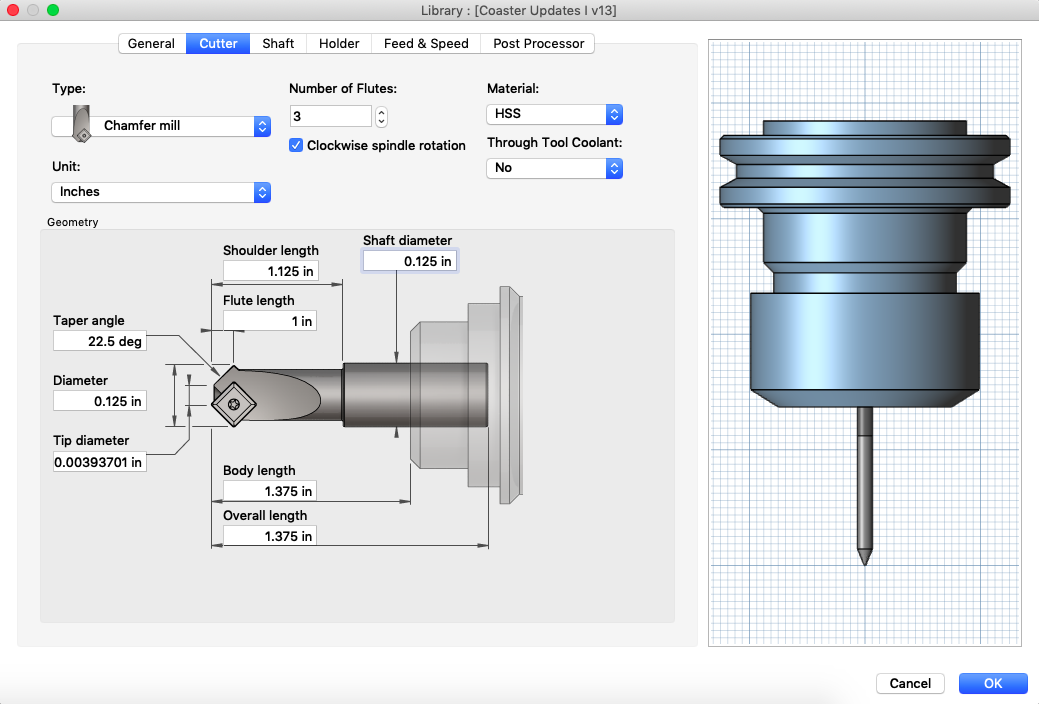
Though there are a lot of dimensions, I’ll touch on three key dimensions: angle (or taper angle), diameter and tip diameter, and how those relate to cutting depth and line width.

Key dimensions defining the geometry of an engraving bit
Line Width
The thinnest line that the bit can engrave is defined by the tip diameter, and this would be engraved if the bit is just barely scratching the surface; the thickest line that the bit can engrave is defined by the (cutter) diameter, and this would be engraved if the bit plunged deeply into the wood so that the entire flute length is in the wood.
You can find many a “V-groove” bits that do not define a tip diameter; if you’re using one of these, you can effectively think of this as having a tip diameter of zero. However, these are typically used for cutting v-grooves - as the name suggests - rather than engraving. And so these typically are not available - or may not be that suitable - for very fine detail engraving.
Engraving bits typically do define a non-zero tip diameter in their specifications, though that diameter may be so very small that its effectively a point that will draw blood if you prick your finger with it! The engraving bits I use most have a 0.1mm tip diameter, or about 1/250th of an inch! This also means that they’re easy to blunt or damage if you drop them on a hard surface.
Controlling Engraving Depth
As the previous few paragraphs suggest, how deep the bit plunges into the material controls the width of the line that’d being engraved. The taper angle is part of that relationship as well. To engrave something of a given width, the bit will plunge (width - [tip diameter]) / (2 * tan [taper angle]). But even without doing any math, if you spend a moment to visualize it, for a given width of engraving that you wish to create, the bit will plunge deeper for a sharper angle bit.
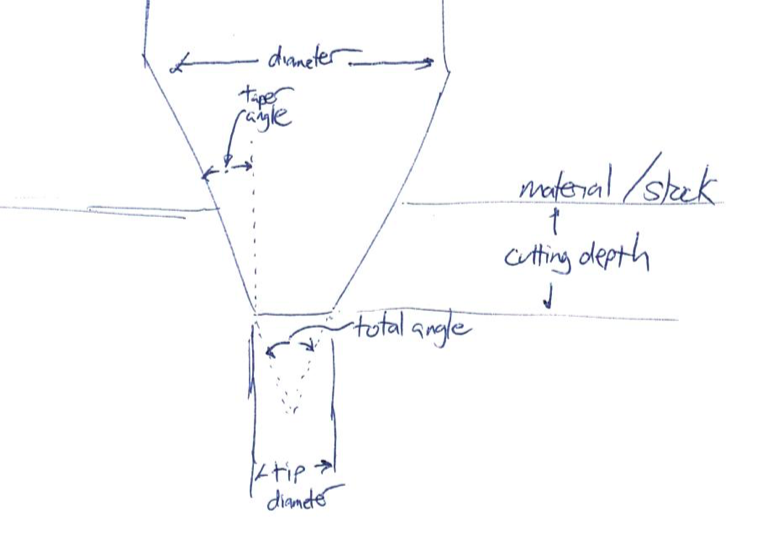
Additional dimensions to visualize relationships as engraving bit plunges into stock
Solving for different parts of that equation:
width = [tip diameter] + 2 * depth * tan [taper angle]
depth = (width - [tip diameter]) / (2 * tan [taper angle])
[taper angle] = arctan( (width - [tip diameter]) / (2 * depth) )
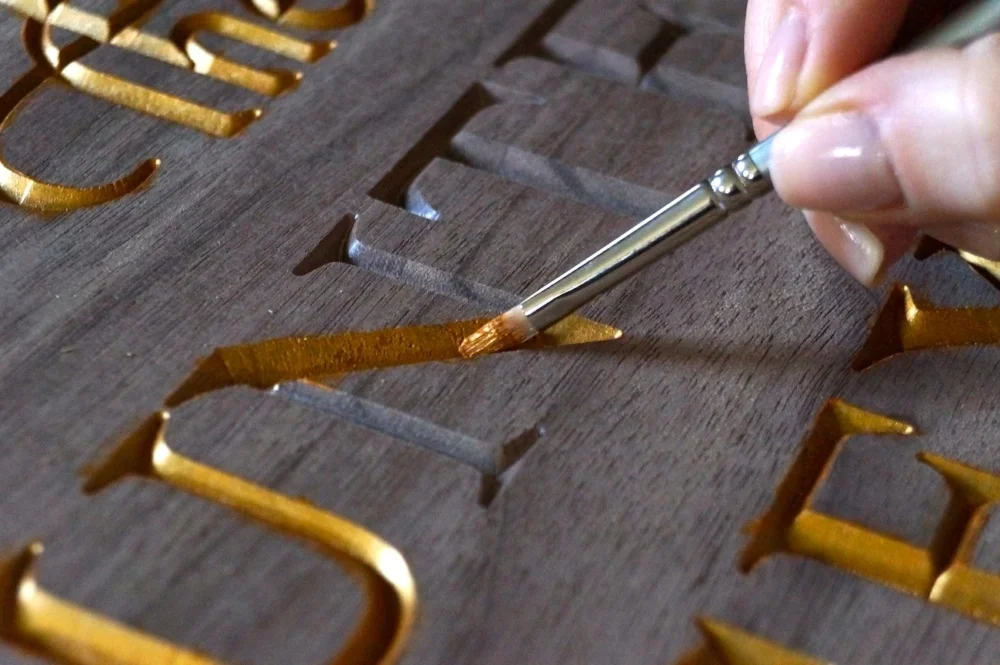
Why is this relevant? Sometimes you need to engrave to a certain minimum (or maximum) depth. Plastics made for engraving typically have two differently-colored plastic layers laminated together, and the letters need to penetrate the first layer but not the second. Or for a similar effect in wood - such as with this commemorative plaque I recently completed - you need to go deep enough to cut entirely through the layer of wood veneer.
Or if your software only generates one engraving pass, your experience may suggest that if the bit will cut “too deep” at once, that might cause your machine to skip steps or the stock to move.
So let’s do that math now: suppose you need to make sure to clear that 3/32” veneer, and the letters you’re engraving have some fine detail at 1/16” thick. And we have a bunch of bits to choose from that all have 0.1mm tip diameter. So the minimum angle would be:
[taper angle] = arctan( (width - [tip diameter]) / (2 * depth) )
[taper angle] = arctan( (1/16” - 0.1mm / (2 * 3/32”) )
[taper angle] = arctan( (0.0625” - 0.00393701” / (2 * 0.09375”) )
[taper angle] = arctan( 0.3123 )
[taper angle] = 17 degrees
So we need a bit that has a 17 degree or sharper (i.e.: smaller) taper angle.
However, given that the widest part of the letters is - say - 1/8”, we want to make sure we don’t cut all the way through the 3/4” thick stock, leaving at least 1/4”! So the maximum depth is 1/2”. Repeating the calculation above with updated numbers, we need a bit that has a 7 degree or greater taper angle.
Angle or Taper Angle
Despite Fusion 360’s use of taper angle (and my continued use of it here), bits are typically not listed by their taper angle, but by their total angle, which is twice the taper angle. We need a bit with a taper angle between 7 and 17 degrees, or total angle between 14 and 34 degrees.
Bonus Topic: Painted Engraving
Though I’ve done this on a few projects, I definitely don’t have the patience (or dexterity) to do it that many more times!
Do you want to paint the recessed letters? There’s always the direct way, applying paint carefully by hand. But if you do not have the patience or dexterity for that - and if the paint is cheap and you have access to a planer through which you can run the sign after the engraving - another approach is to make the engraving 1/16” deeper, paint the letters not worrying about being sloppy with paint on the rest of the sign, and then take off that paint-splattered top 1/16” with the planer.
If you go this route, though, it might be safer to do two passes with engraving control file on your CNC - the first with the work zero set at the surface, and the second with the work zero set 1/16” below the surface. That’s because Fusion 360 - or whatever engraving software you are using - does not know you plan to go deeper. So if the tool path already fully plunges the bit into the stock to get the full width of the bit, going deeper by another 1/16” will take the bit deeper than the length of flutes, either forcing your machine to miss steps, or creating an engraving with very rough edges as the non-cutting edge pushes through that 1/16” of material.