

The buffet of the seven piece art deco storage unit / room divider I’m building has two tambour doors. Beyond adding to the overall aesthetic, it actually is a necessary design element given how the layout works together because part of the storage opening would otherwise be blocked by the bench.
I recently fabricated my first set of tambour sliding doors for one of the buffets in an art deco piece - the doors looked beautiful and the channel they would slide in perfectly matched the template. Five days of fabrication and test fitting coming to fruition!
But when I did the final pre-assembly fit check to see the doors sliding in the channel, they get stuck right at the beginning of the curve! I panic - are those five days of work down the drain?!
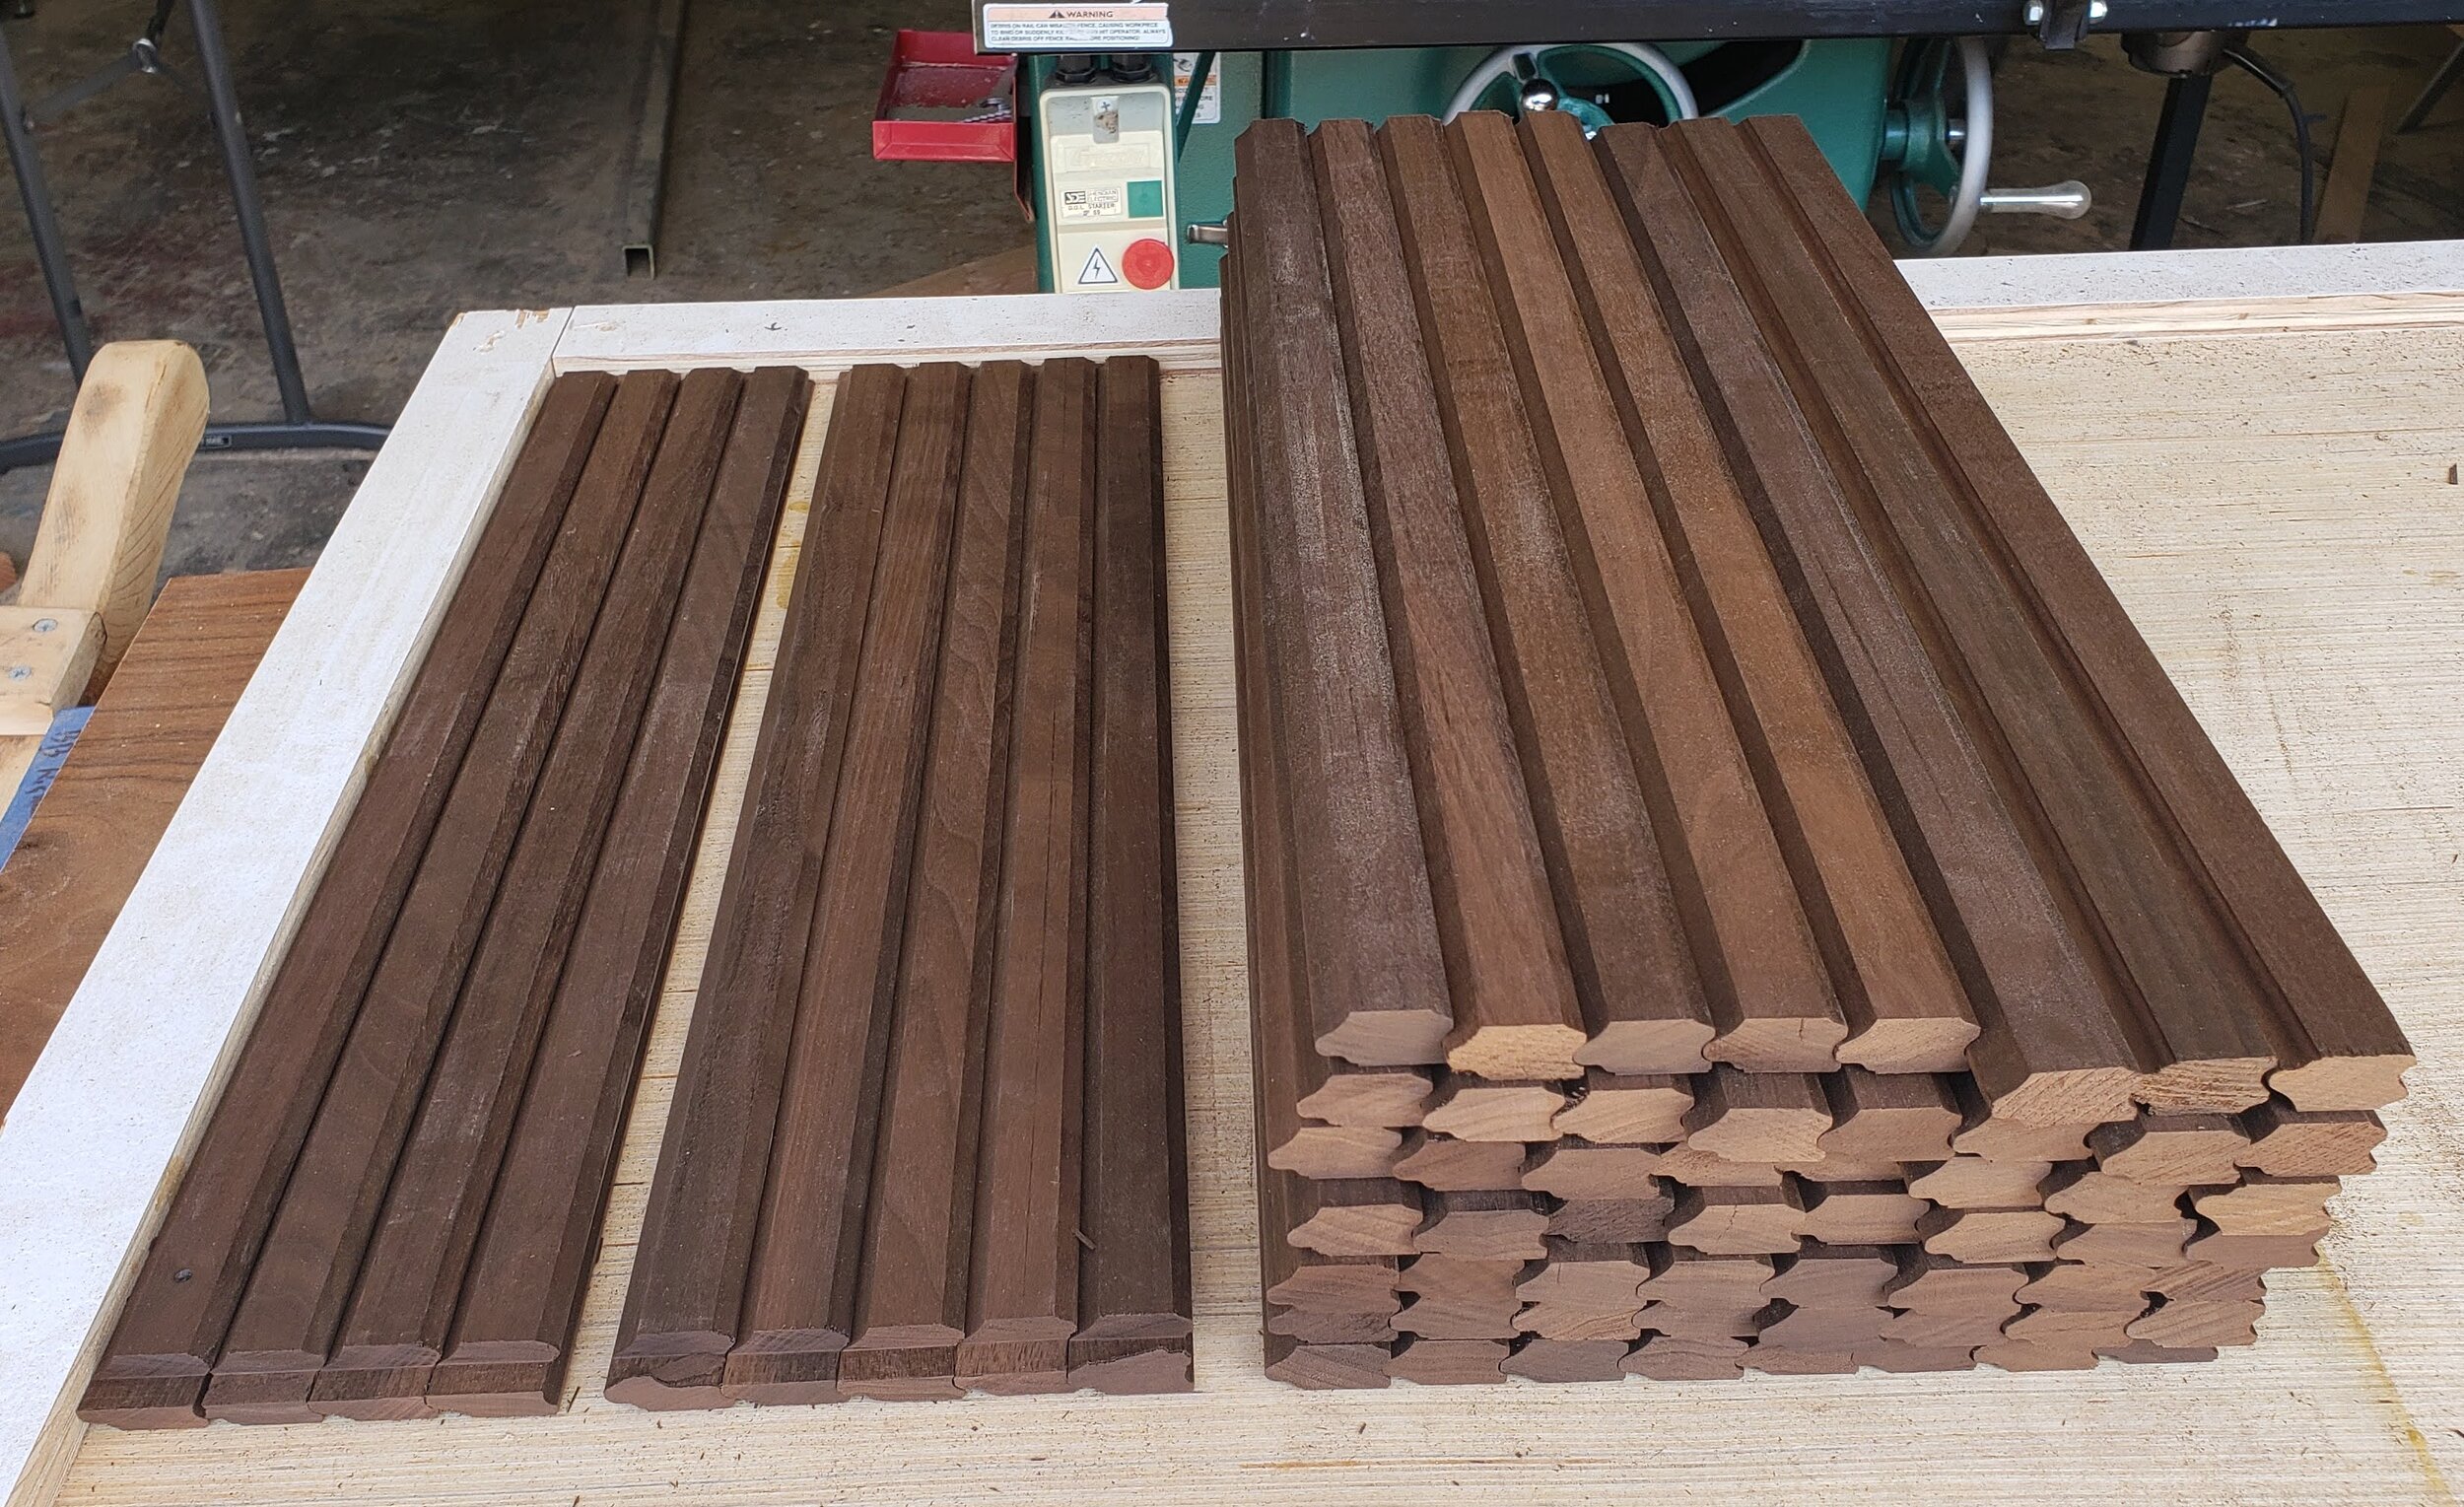
Stack of 65 or so identical walnut tambours, with the two sides shaped.

Closeup of tambour prior to gluing the canvas backing or cutting the tenons.
Sitting down with a pencil & paper and resurrecting some high school geometry, I was able to identify the problem and find a solution.
In short, this post will help you figure out what the tightest radius tambour door & channel that you can make, which is determined by the relationship between the channel width & radius, the tambour tenon thickness, and the tambour tenon width.
Though the specific calculations and some of the diagrams are applicable just to tambour doors with a backing, if you are using a steel cable door or interlocking slats such that the hingepoint is in the middle of the slat rather than the back, the same principles apply, but you’ll have to update equations to incorporate the different hinge point.
Tambour Intro

Though not everyone knows the term “tambour door”, almost everyone can picture an old-fashioned roll-top desk. Tambour door is the fancy name for that roll-top cover; tambours, in the woodworking sense, are simply thin slats of wood. Those thin slats are then typically shaped with a special matching profile on the front & back edge, and then joined together typically with a hidden but flexible mechanism like a canvas backing or an embedded steel cable, or perhaps via an interlocking joint from the wood slats themselves. Very inexpensive tambour doors may be made with molded plastic where the backing is just a thinner portion of the same plastic.
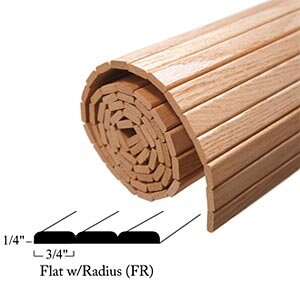
Pre-fab door of oak slats

Pre-fab channel that is compatible with the pictured pre-fab slats; of course, a straight channel is also available. Note the relatively tight radius - this is due to the very narrow slats (3/4”) in combination with the thin tenons (1/4”).
If you’re lucky, you can find a pre-fabricated door that is close enough in material and size to your requirements to save you a lot of the work, and perhaps even a pre-fab track to use instead of a channel, if you can find a way to blend, hide, or live with the aesthetic of the plastic components.
But if you’ll be making your own, you need a special matching router bit set. I’ve found two from reputable suppliers: this Rockler set, and a more expensive set from Amana that creates interlocking slats that open up other design possibilities as well. And you can find a few good tutorials online on how to make the doors; I used the method described in this tutorial with a canvas backing, and followed the dimensions and lead slat in the instruction sheet that came with the bit set to fill in some the dimensional details missing from the tutorial.

Tambour “sun lounge” featured by Stu’s Shed, made of around 130 interlocking slats using Amana’s three-piece tambour bit set.
My Error
A tambour door slides along a pre-cut channel (or a pre-fabricated track as shown above; I’ll be using the “channel” terminology, but the math and issues described here are identical whether you use a channel or a track). That channel often continues along the back of the piece in an area typically hidden by a false back in the storage area.
In order to open and close smoothly, you’ll want a very large radius channel, but in order to “waste” the least space in the piece, you’ll want a very small radius channel. Unfortunately, while there are a few online designs of cabinets that “work”, and one or two anecdotal comment threads on woodworking messageboards along the lines of “yeah, I was able to get a tight channel of four inch radius to work”, there’s not much guidance on the dimensional boundaries of what will and will not work.
I used the Rockler dimensions for the slats (starting with 1-3/16” wide slats), but the anecdote of “four inches can work” - actually, the inner radius of my 3/8” wide channel was 4-1/8”, and outer radius 4-1/2”. I tested a couple of slats individually in a trial channel cut into some scrap plywood, and then tried holding three together and sliding them - it all worked.

Two mirror image tambour tracks routed into the panels, prior to applying the color-matching stain. You can also see the thinner 1/4” channel in the back where the false back of the storage area will be. Note that I wanted to use walnut plywood in the center of each piece to match the rest of the pieces, but I wanted to use more durable solid walnut for the channels; these pieces are joined via hidden tenons.
So I cut the channel into the carefully prepped panels, and finished fabricating the door. All told, these steps took about a week, including the fabrication and staining of the top & bottom panels into which the track was routed, and used about $350 of materials.
When everything was finally dry and I tried the fit again, and I panic when the door just won’t make it around even the first inch of the curve.
Simplified Tambour Tenon Geometry
So I pull out a pen & paper - or more precisely, my laptop and Fusion360 - to help me figure out what is going on. If we focus in on the curved part of the tambour channel, we can simplify the channel to a pair of concentric circles. And given the canvas backing I’m using, the back edge of the slats is effectively hinged together - we can also simplify that by just drawing the slats with the corners along the inner radius touching. Though the slats themselves are thicker than the tenon that runs in the channel so as to hide the channel and give a more finished appearance, it is only the tenon that’s relevant to the sliding motion.

Idealized tambours with thinner tenon to hide the track going around a circle

Focusing in on just the thickness of the tenon removes some unnecessary detail masking the problem area

A line drawing is more than enough to visualize and calculate the problem

In fact, we do not even need multiple tenons in the drawing. The problem is that the gap between the corner of the tenon in the lower right (or lower left) is very close to the outer edge of the channel.
With this simplified drawing - and with the real dimensions from my slat and channel - I immediately see the problem. In fact, we can see it with only a single slat drawn: though a single slat fits and will slide, the clearance before it binds with the channel itself is only about 1/64th of an inch! So any imperfections in thickness, deviations in perfect flatness of the tenons or canvas, or deviation of a tenon’s perpendicularity to the channel wall will make the slats bind on the channel.
Understanding this, there are four possible solutions to my predicament:
Remake the door with narrower slats than the 1-7/32” I stared with.
Remake the bottom & top pieces with larger radius channels than the 4-1/8” I used, potentially impinging on the storage space.
Make the channel wider with a bigger bit than the 3/8” bit I used.
Make the tenons thinner than their current 5/16” thickness.
For my situation, #3 & #4 were the best options requiring the least rework. But for those - or even if I wanted to consider #1 or #2 - I needed to know “by how much” bigger or smaller to go.
Equation
Going from the drawing and understanding to an equation, the smallest gap at the corner of the tenons as the tenon rounds a channel in the simplified drawing above can be calculated with a few variables and the Pythagorean theorem.
c = channel width (i.e.: the diameter of the bit used to cut the channel)
r = inner radius of the channel
t = thickness of the tambour tenon
w = width of the tambour tenon
gap = (c+r) - sqrt [ (r + t)^2 + (w / 2)^2 ]
Making It Work

Successful fit test, though I’ll save finished photos for a future blog post!
Where I started, c = 3/8”; r = 4-1/8”; t = 5/16”; w = 1-7/32”; so the gap was 0.0207” or around 1/64”. Clearly this is too small. If I re-cut the tenons to be 1/4” thick instead of 5/16”, they’ll still be strong enough. I don’t know that will solve the problem, but plugging this into the equation, a 1/4” tenon will leave me with 5/64” gap - just a tad over 1/16” of an inch. This seems reasonable and worth trying before doing something more drastic.
I carefully protect the finished face of the door as I slide it thru the table saw, cut, and voila - my fear of a lost week of work is removed with a few hours invested here. I now have a set of smooth-sliding tambour doors!
I don’t have a magic number that identifies what gap is too small or big enough, but I do have two data points that sandwich that sweet spot: 1/64” is too small; and 5/64” is sufficient. And of course, there are other considerations as well that limit going to an even tighter radius: the tenon must be thick enough to have substantial strength as the door slides over decades of use; and the tenon should not be so much narrower than the channel that the door is wobbly in the straight sections.
In my case, a 1/4” tenon is definitely strong enough, and a 1/4” tenon in a 3/8” channel gives a little play, but not so much as to be noticeable, especially given the large size of these doors (approx 24” tall by 36” wide).
Other Gotchas
There are two other “gotchas” in the final assembly related to proper channel radius: the lead strip, and the feed in channel. In the final assembly when I again ran into some binding, I had suspected the former problem, until I ran the numbers and realized I was getting caught up due to the second problem.
Lead Strip
The lead strip may be a little wider to make it clearly visible and perhaps provide a mounting point for a knob or handle. I used a 1-1/2” wide lead strip, compared to the 1-7/32” regular slats. Given that the lead strip typically doesn’t regularly negotiate any curves in a buffet door (though it would in a roll top desk), it need not necessarily have as much clearance as the slats - there just needs to be enough clearance to make the initial slide around the corners as you insert the tambour door assembly into the top & bottom panels.
If I were using a much wider lead strip - say, 2-1/4” - even my reduced tenon thickness of 1/4” would not be sufficient, so I’d have to consider other approaches like notching the front edge of the lead strip tenon, effectively making it narrower.
Feed-In Channel
Finally, the feed-in channel: this is what provides the entry for the door after the casework is prepped. Though you could potentially build the casework around the door, that can be challenging to do with respect to having enough hands to hold everything in place. But more importantly, building it in place means there’s no opportunity for later service; a feed-in channel provides an access point for you to repair the door if ever needed just by removing the back panel.
However, typically, the feed in channel has a radius in the opposite direction than the curves the door will have to traverse most of the time. While there is a little play in a canvas backing, a well-made door cannot flex very far in the opposite direction. Thus, you may have to use a much larger radius - or enlarge the channel - at the exit. Even if, with a lot of elbow grease, you can finagle the door into the track, should that door ever need service years down the road an extra hour widening the track now will save your future self - or a refinishing shop - many many hours trying to force the door out later.
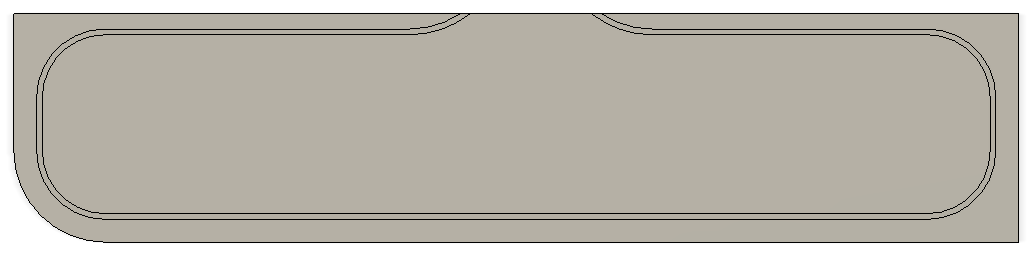
This is the track I cut - note the relatively small-radius lead-in channel at the top center. It has a radius about 50% larger than the inside corners, but that was still not nearly large enough for the door to flex in the opposite direction.
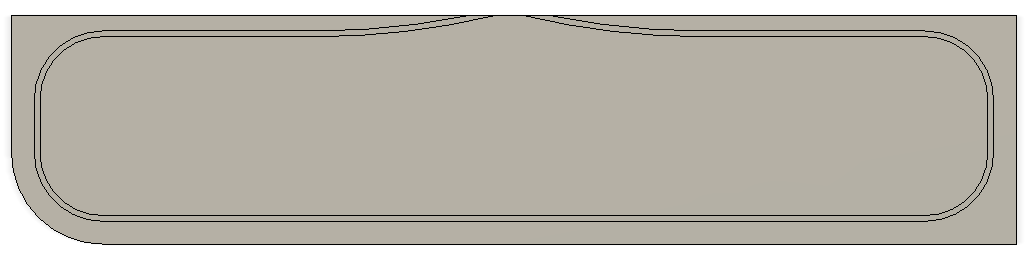
The much-straighter lead-in track in this diagram would have been a better channel design to use. However, I was able to notch the tighter radius to approximate a looser radius for much easier future service.
Lubrication

One final tip: a good lubricant meant for wood-on-wood sliding such as “Slipit” will help ensure smooth movement.
Wrapping It Up
Hopefully these guidelines save you a brief panic like I had in this project - though I’m glad I came to an easy fix that did not require days of rework, it would’ve been even nicer to have avoided that panic in the first place!
I’d love to hear your thoughts or learnings from your own experience with tambour doors as well, or other “uh oh” moments that turned into a learning experience for the future.