
I had thought the shop was full before, what with wood stacked on the floor and all the wall space covered with machines. But creative reuse of space has allowed me to invest in a few new tools to expand my capabilities, which I'll cover in the next two issues.
Since I had the key woodworking tools already (see Part I and Part II), these are more specialized tools used less frequently, but that allow me to create even more unique pieces and furniture. Some of these will get one (or several) posts in the future, delving into both the nitty-gritty of the tool, and some of the pieces I've made with it, but until then, I'll get into some of the motivation for each bit of equipment, and of course, what it is.
Veneering Equipment
While all my small pieces are made with solid hardwoods, occasional larger furniture grade pieces I build are veneered. I'll confess I started as a veneer luddite: "Sure, veneered furniture can be cheaper because you can use crappy interior wood and cover it with a nice sticker, but all real furniture is made with solid wood".
But first: Why Veneer?
My naïveté here was dead wrong on several counts. First, veneer has a long history, dating as far back as the ancient Egyptians, over 5000 years ago (source).

A prototype coffee table base made of multiple pieces of hardware, joined only with glue, cracked by moisture and temperature variation - see more details here.
Second, veneered pieces are necessary for many designs. Typically, veneered furniture is built with a more temperature-and-humidity stable underlying base - such as with medium density fiberboard (MDF) - so that it will have a much longer life than similarly constructed hardwood furniture. You can see an entertaining story and pictures of an example of this from someone who started from a similar place of naïveté as myself here.
Or, if you want a thick shelf - some recent kitchen cabinetry I bid on called for a 2" thick shelves - even though solid piece of lumber might be available and may be within the your budget, it may be too heavy to easily wall-mount. A veneered torsion box (i.e.: hollow-core construction; more on these in a future edition) may be a much better way to go.
Sure, well-made tenon-and-mortise construction or dovetail joints will last forever. But if you're not going to the trouble of those, or don't want the style of those, you're left using glue, biscuits and screws. Yet you still need to consider wood movement with a larger piece, so the easiest way is indeed with unattractive but stable MDF, and then by making it look nice (or amazing) with a veneered surface.
Third reason to consider veneers: you can use a far wider range of woods, far more affordably, and get the appearance of far wider boards than are commercially available.

If there's no waste and the boards are perfectly sized, this table would cost about $70 of solid wood in oak (as pictured here), $200 if walnut, $400 if zebrawood or wenge, or $800 if teak. Keep in mind 1) there is waste from board sizes not being perfect matches to the furniture you're building, 2) there's hardware costs, and - most importantly - 3) there's labor and shop costs. Veneers make those more expensive wood finishes possible more affordably, as well as opening up all sorts of unique designs, as well as making the finished piece more stable to environmental changes, which is critical if the joints and construction doesn't allow for wood movement.
For some price comparisons, a square foot of 2" thick rough walnut is approximately $19 at my local distributor (or $8 for one square foot of 1"), but wenge or zebrawood is twice as expensive as walnut, and teak is twice again. So a 1" desk similar to what I just made of solid oak for a client would cost - for the wood alone - at least $200 per desk if walnut, at least $800 if teak, albeit only about $70 with oak. But with veneers, almost any wood would be achievable with about $100 or so of raw material (albeit with a lot more labor with veneers).
So if you want to feature more exotic wood grains, the only way to do it affordably is with veneers. This is also where the cheaper (and sometimes not so cheap) manufactured furniture comes in - sometimes that "veneer" may not actually be wood, but rather, its a simulated wood plastic laminate, or even just a cheap sticker. But if it's a real wood veneer, it will still give you warmth and range of color and grain.
Finally, you can do beautiful things with veneer that you can't do with hardwoods, such as this amazing cabinet done by Scott Grove, an award-winning woodworker; this piece was also written about in detail in his book, Advanced Veneering & Alternative Techniques.

Finally, the Veneer Toys!
With the motivation for veneering clear, let's get into the necessary - or at least very useful - for it I recently added to the shop.
Vacuum pump: As the name implies, this produces a vacuum, but not for cleaning. Rather, it's a stronger (but typically lower volume of air flow) than a vacuum cleaner. A veneer is just a big thin sheet of wood; to attach it to the MDF, you use a thin evenly applied layer of glue. But you need to evenly clamp that veneer to the substrate while it dries.
The vacuum pump enables you to apply even clamping pressure across a large piece. Basically, you put the glued-up veneered panel in a big plastic bag, attach the vacuum pump to the bag, and turn it on. With a vacuum inside the bag, the weight of the entire atmosphere above pushes down on the veneer - you can typically get the equivalent clamping pressure of up to 1800 pounds per square foot. And unlike a giant mechanical press - it works just as well for curved shapes as flat surfaces, so long as you have a big enough big!

The Excel 5 vacuum pump I picked up.

Wendell Castle's massive mechanical clamping press. There are hydraulic and other types of automated presses as well, but vacuum is the most common in a small shop.
Of course, in addition to the pump, you also need some giant plastic bags that can attach to the pump, open at one side to insert the thing you're clamping. But these are not particularly interesting to look at when not in use, as they're just giant sturdy ziplock bags.
Edge bander: While the vacuum press will allow you to veneer a table top, it isn't that great for the side of a panel; a more specialized tool comes in handy here that allows you to apply an "edge band" of veneer. Basically, you use a heat-activated adhesive on a roll of veneer, and then some tool to apply even heat and enough pressure to bond the veneer.
A larger shop that does a lot of this might have a full-sized floor mounted tool; at the other extreme, many a piece have been finished with your common household iron and lots of care. I added something in a middle, a dedicated handheld tool from Grizzly. It'll still take some practice, adjustment, and care, but I look forward to using it on my first piece early this year.
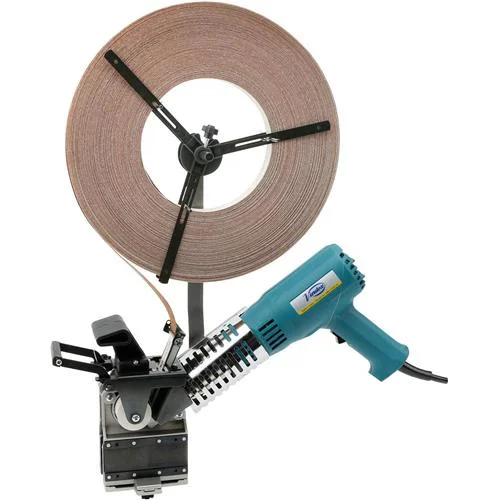
The handheld edge bander I now have, with a roll of banding. This can apply rolls as wide as 2", which come in just about any wood species (as well as a variety of melamime colors).

A floor-mounted edge bander far beyond the reach (and needs) of my current shop!
Giant Clamps

The six foot clamps are taller than my dust collector!
I earlier spoke about bar clamps and how critical these are for any shop. But my shop previously maxed out with 24" clamps, with just a pair of 4' clamps. Well, this ain't really any new and exciting technology - sometimes you just need a bigger version of the same thing!
I picked up four 6' clamps to allow me to complete the pair of commissioned solid oak desks. At about 15 pounds each, they're tough to maneuver, but when you need them there's no way around them! The joint on the top is a standard dovetail, but the shelf immediately below the top of the table is joined to the legs via biscuits, and thus needed a lot of force clamping the legs to the shelf while the glue dried.
Dovetail Jig
A dovetail is a very common and traditional woodworking joint that gives a wide range of appearances and is incredibly strong. It's best explained with some pictures.

While these can all be cut by hand - and traditionally, have been! - I'll confess I do not have the patience (nor anywhere close to the skill) to do that. Fortunately, they can be cut quite easily with a router, a specialized jig, and specialized cutting bits for the router. Though there's many dovetail jigs on the market, I opted for a very flexible Leigh jig that allows you to create not only the more traditional dovetail joint, but also some really unique more curvy joints Leigh calls "isoloc" joints. Look for these isoloc joints to be featured in some coming hardwood clipboards I have in process.


Examples of the unique "isoloc" joints that accomplish the same joinery effect as a dovetail, but with a more organic form.
While I've already used the dovetail jig on the table I built above, I neglected to get good photos of the finished product, but you can see the joint on this practice box I built.
