

Which size & type to use? How fast should your machine go for different sizes?
Though I’ve been using a CNC for several years for everything from jewelry box engraving to stair tread fabrication, given the limited power of my current machine, I’ve been able to largely ignore what is often a critical topic with larger machines: speed. More specifically, what speed (revolutions per minute, or RPM) should the spindle - or cutter head - turn at, and what rate should the cutter head “feed” on the material (inches per minute, or IPM) via the drive motors moving the spindle.
However, as I’m in the process of upgrading my machine to something with far more capabilities, just as a potential client project has come in that might leverage those capabilities, it’s now a topic worth some attention. My reading and exploration here came up with some numbers that I found surprising, but that also explained some of the problems I’ve seen with my current machine - so I thought it worthy of a post!
Choosing the Right Speed is Important
Obviously, if your machine is going “too slow”, you waste machine (and your own) time. But you also potentially dull your tools more quickly and get a lower quality cut as the cutter head is essentially burnishing the workpiece rather than cutting it.
On the other hand, if your machine is going “too fast” - assuming that it can keep up with the speed you’ve asked of it - you’re potentially generating too much heat on the cutter, also a way to dull it prematurely. The chips being cut off may also be too big, giving a lower quality cut.
And of course, you will soon reach a point where the machine just can’t keep up: either the drive motors or belts will slip, the spindle may stall, or the cutter will deflect, causing it to chatter and further degrade the quality, or just break.
Limits to Speed Selection
My current machine - an X-Carve by Inventables - definitely does not let me go too fast. The spindle is 1-1/4 horsepower, with a very coarse (and approximate) manual control for speed. And the largest diameter bit I can use is 1/4”.

The speed dial on top of the router or spindle is not very conducive to changing mid-job…

… but also would require reference to this table to approximate speeds.
But the machine is far more limited due to two other issues:

A missed step or two from a too-aggressive cut caused my CNC to take a chunk out of this sculpture.
Drive motors can slip: The relatively low power stepper motors control motion in this machine via belts. The belts or the motors can slip if the cutter head gets too much resistance. Because the motion control is “open loop” - there’s no feedback to the controller to confirm the actual position - a slip means that the machine is no longer where the software thinks it is, so what you’re making starts getting errors, and these errors quickly compound as different layers of the cut no longer line up and the machine then experiences even more resistance.
Flexible frame: The frame is not very rigid. Even if the motors do not slip, the aluminum extrusions of the frame flex with the torque of the spindle or twist as the spindle acts as a “lever arm” cutting into the wood too deeply.

This milling was done with too-aggressive of a speed, causing the mill to “chatter” or vibrate against the edge as it deflects from the excessive cutting force.

Limiting the tool deflection is key to getting a smooth finish.
My machine has been more than sufficient for many projects, but I thought it time to upgrade to address the above limitations, and also, to give me a lot more flexibility in tool selection.
Tradeoffs & Calculators

One critical driver of the feeds and speeds calculations is tool deflection - how much the tool bends from perfectly straight based on the force from it cutting into the workpiece. Understanding this helps with initial intuition on the relationships in the calculations.
A larger diameter end mill will deflect less. So you can plunge it deeper into the material. So a greater length of its cutting edge can be put to work, also spreading the heat and wear of the cutting action across more of the bit, yielding a longer life. But a bigger diameter end mill also requires the RPM of the spindle to drop to maintain the same surface speed of the tool’s teeth against the material. And obviously, a bigger end mill also limits the detail that can be cut: it cannot cut any corners with a radius smaller than the diameter of the mill itself, of course. And a bigger cutter, removing more material at once, requires a spindle with more power; many motors are unable to deliver their full-rated power at when going more slowly than their max speed.
The number of flutes also has an interesting relationship: more flutes mean more cutting edges contact the material with every rotation. Doubling the flute count of an otherwise identical tool might lead you to think you’d be able to double the spindle speed and double the feed speed, assuming all your motors can keep up. But there are two other implications of more flutes that counter that. More flutes means there’s less metal in the tool supporting its rigidity, so it will deflect more. And as you squeeze more flutes into the same diameter tool, the channels of the flute get smaller, so they can clear fewer chips. In fact, given some speed limitations even on my newer CNC, two-flute tools will tend to be much more efficient for material removal for me than four-flute tools.
But that’s just the intuition - of course, there’s a whole bunch of math and physics involved in determining the “best” speed; it depends on the multiple attributes of both the tool (type, material, coating, geometry, number of flutes) and the material you’re cutting (wood, aluminum, steel, plastic, etc.).
Fortunately, there are many online and app calculators that take care of all the calculations, but if you’re interested in those details beyond the rough intuition above, this PDF from AutoDesk starts at an introductory level but then gets quite deep.
Or check out some of the mobile or desktop applications for the actual calculations - one that I’ve found very easy to use is the mobile app FSWizard, and I’ve seen many threads in woodworker forums refer to the desktop package CNC Cookbook.

FSWizard screenshots - choose the material; enter the tool attributes and physical setup; and see the results. It’s free, albeit with advertising.
An Example
I made a laminated hardwood tray in 2018 as a commission; using a 1/4” four-flute end mill, taking off 1/16” of depth at a time, the tray took over 9 hours to carve.

So let’s try plugging in a few different end mill sizes into the calculator to get the right feeds and speeds. This gives me the ideal RPM & IPM to use, which I can then plug into Fusion360 to generate a tool path and a machine time estimate. I’ll summarize all these speeds and metrics into three stats: the power required of the spindle; the material removal rate; and the time estimated to do the carve.
Updating my Conservative Defaults
First, I tried using the calculator to figure out the “right” parameters to use for cutting with a 1/4” four-flute end mill rather than the default 16th of an inch at a time I typically use. This yields a fairly low maximum material removal rate (MRR) of 3.7 cu in per minute, requires a 0.37HP spindle, and takes about 8.5 hrs to carve.
So while the settings in relation to cut depth, overlap, and speed I used to initially cut this were far different (and I dulled my bit more quickly and got a lower quality finish that required more hand sanding due to my suboptimal settings), I won’t be saving a lot of machine time in the new machine if I stick with the same 4-flute 1/4” bit.
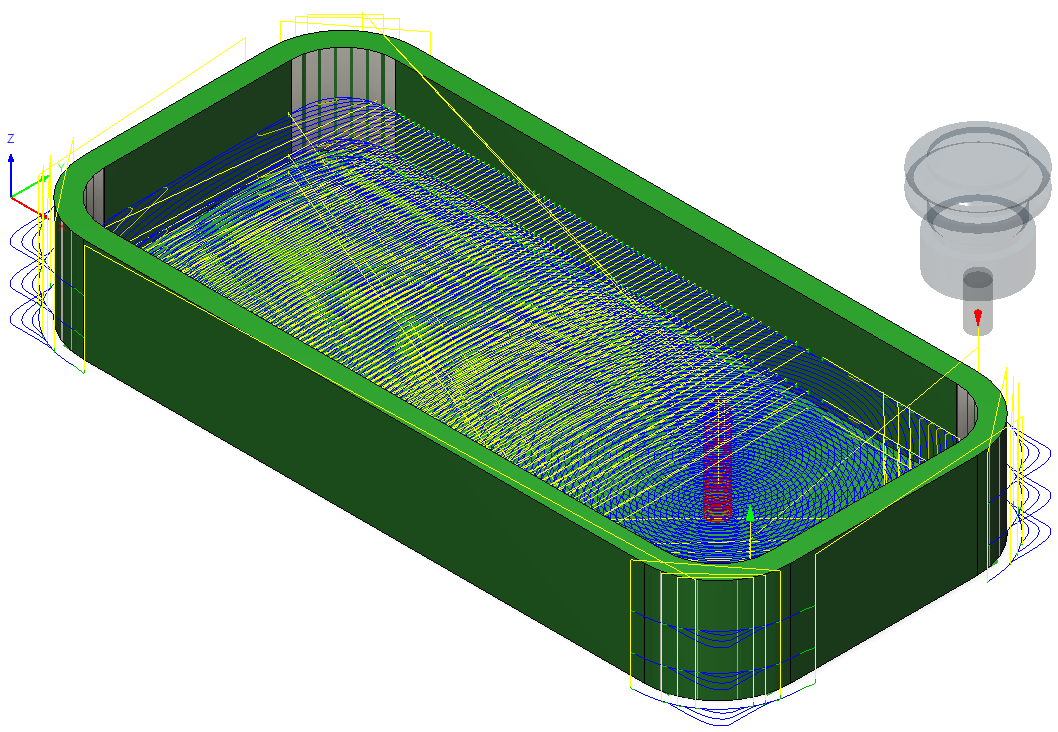
The calculated toolpath for an end mill. Blue lines show cutting; yellow repositioning; and red are helical movements into the material so as to not overload the less-efficient-at-cutting end of the tool. All these “ancillary” movements also gives insight into why knowing max material removal rate and the amount of material to remove just provides a lower bound on the machining time.
End Mills
However, I can try a stiffer 2-flute bit, as well as larger (2-flute) bits up to the maximum 7/16” shank my new machine can handle. So I simulated a few different end mills up to and a little beyond the capability of my machine, all assuming a 2.5” tool “stick out” to get to the bottom inside corners of the tray.

The 1/2” & 9/16” mill will fit in my spindle, but not in the automatic tool changer I’ve added on top of the spindle. Thus, the two largest mills here show me the tradeoff in speed I’m giving up by adding the ATC. As for spindle power, every 10 cu. in. per min of MRR requires about 1 horsepower when working in wood.
With each increase in size, the maximum depth of cut increases due to reduced tool deflection, allowing more of the cutter to be engaged - this both speeds up the cutting of course, but also lengthens the life of the tool since that cutting action is spread over more of the length.
Now, let’s see what happens to the material removal rate for a tool stick out of only 1” for the 2-flute mills.

The 9/16” end mill with only 1” stick out has the highest material removal rate, but taking off this much material requires about 3.1HP, just beyond the power of my 2.95HP spindle, even if I could fit the bit into my automatic tool changer.
A shorter stick out meets a stiffer tool; not surprisingly, this suggests that if a tool change can be done quickly and repeatably enough, there is a performance benefit to gain by using a short fast tool for the middle where the machine does not need to avoid a vertical wall, but then to use a longer slower tool only for the edges that approach the walls.
Practical Implications
This is all well and good, but what’s this mean for Branching Out Wood? Well, it’s hard to say definitively because I still do not have the new machine. I’ve pieced it together from multiple vendors and some of the key pieces won’t arrive for a few more weeks.
But other than potentially being able to service clients that have a lot of material removal in their designs, applying the right feeds & speeds with my stiffer & stronger new machine will also allow me to cut or engrave aluminum for the first time, as well as revisit some of my own earlier sculptural pieces that just proved too much work for my current machine.

This one-of-a-kind lamp - which I kept for myself - took about 30 hours of machine time; between a faster machine and automatic tool changing, I can potentially get an even-more detailed carving in perhaps as little as a few hours.

This frame took hours to carve, and yet was still in want of more detail, and also required a lot of hand sanding. An automatic tool changer, in combination with flexible speed control, could get a higher quality result much more quickly.
Stay tuned for photos & descriptions of my new machine when it’s finally all in place!