
About a year ago, I started exploring upgrade options for my trusty 13” DeWalt planer. The planer has served me well over nearly 15 years, especially after I upgraded the cutterhead from straight knives to a helical head. The DeWalt DW735 lunchbox style planer has a lot of strengths for such a small and affordable planer and given my primary use case. That is, I typically do under 100 board feet for a project, and do not use a drum sander for a finishing pass, due to the good surface quality finish from the planer given its rubber in-feed and out-feed rollers, and due to the lack of space in my current workshop setup.
However, at only 13” wide, and at just over 1HP, I’ve long since outgrown it - even with a recent motor rebuild, I typically have to take off 1/32” or less at a time for a full 13” board. I started searching for a replacement planer, reading reviews on Grizzly and Powermatic machines, even bidding on far more expensive machines on used equipment sites (check out West Auctions & Machinery Max). After a few failed auction bids, I finally decided to bite the bullet and purchase a new Felder planer (the D951); at around 1500#, it’ll be the largest and heaviest piece of equipment in my workshop by at least a factor of 3.
But it also has some other specific requirements that I’ll cover in this, and future, posts:
Dust collection: 160mm port, min 900CFM / recommended 1100CFM
Electrical: 7.5kw of 3-phase power
Positioning & movement: how to get it off the truck and moved around in my workshop
Dust Collection Status Quo and Needs

Grizzly G1029 dust collector, my starting point.
Also for about 15 years, I’ve been using the 2HP Grizzly single stage G1029 (which I got used for $200 in 2008). Though most newer Grizzly dust collectors have aluminum impellers, the G1029 has a steel impeller that - despite the many impacts I’ve heard with debris over the years - looks like it came off the factory yesterday. It has a 40 gallon collection bag on bottom, but the filtration was provided by a 40 gallon filter bag on top; this was rated at filtering out 30 micron particulates, but leaving the finer dust to float in the air. The G1029 has a 6” inlet which is split into two 4” ports that serve my shop via 4” PVC trunk lines and flex hosing that go the last few feet to the tools.
Thus, there are two (actually, three) problems I need to solve:
CFM: A 4” hose with only a single port open can easily support 350 CFM; it can potentially support twice that. And I’m measuring about 600 CFM out of the 4” hose closest to the dust collector (approx 5’ long). But it can’t support 1100 CFM. I need a bigger pipe from the dust collector to the planer.
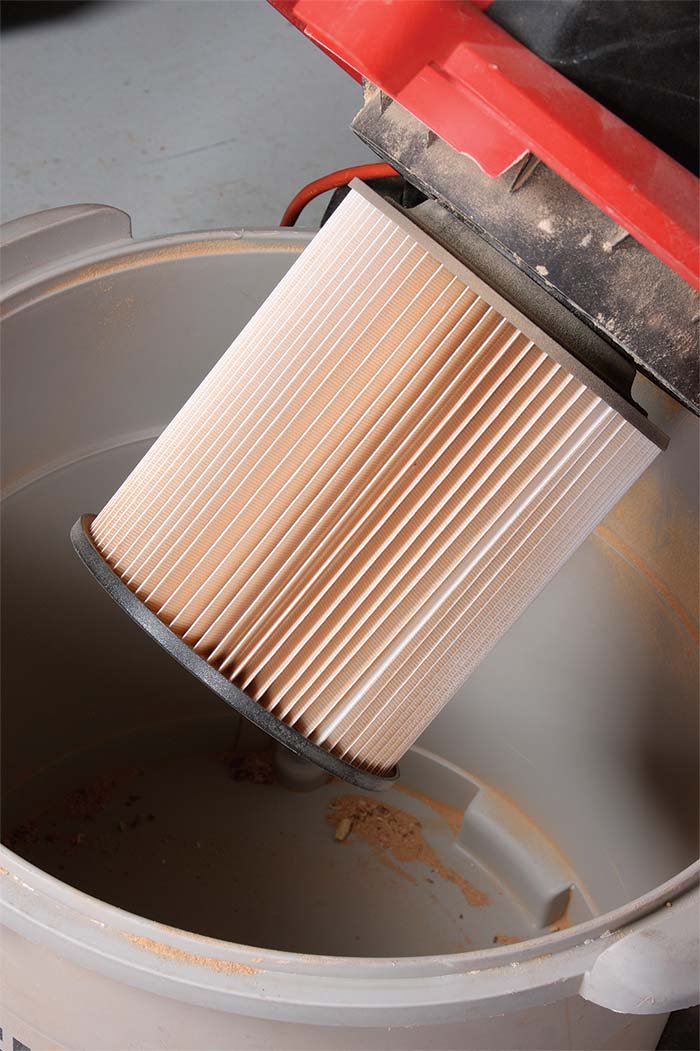
Filtration: The filter bag is not very effective with small particulates, and yet replacing it with a finer filter bag will put more resistance on the blower, dropping the CFM; I need to switch to a 2-stage cyclone setup, with a finer (and larger surface area) filter.
Position: Almost all the tools that sit in the middle of the shop - the DeWalt planer, the table saw - are on casters so I can move them out of the way as needed and when I work with long boards, I can shift them to get enough in-feed and out-feed space. But the new planer will be immobile, and the only place it can go with enough in-feed / out-feed space is where the dust collector is now. So the replacement system, despite being larger, will need to hang from the ceiling, and squeeze in the ~26” wide space between the wall and my ceiling-mounted CNC.
Upgrade Path: Single Stage to HEPA Two-Stage
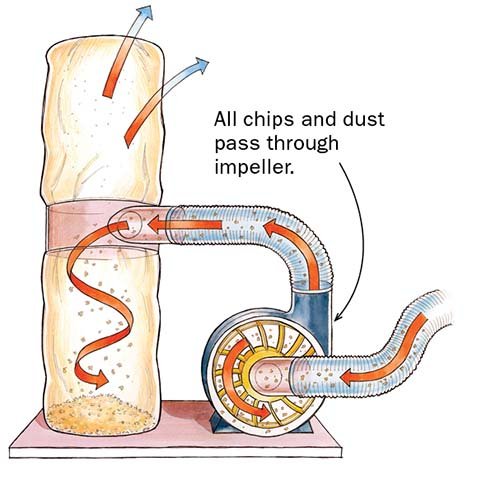
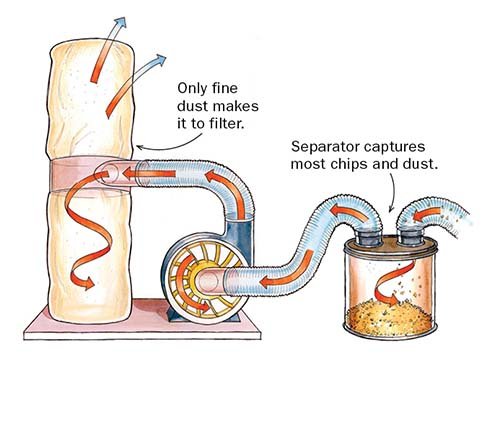
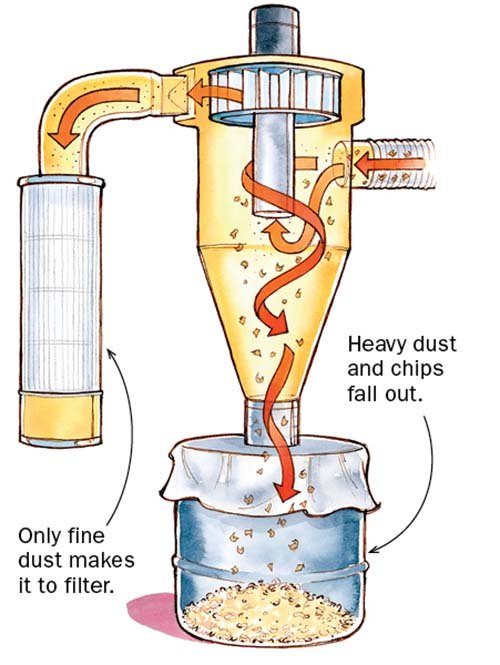
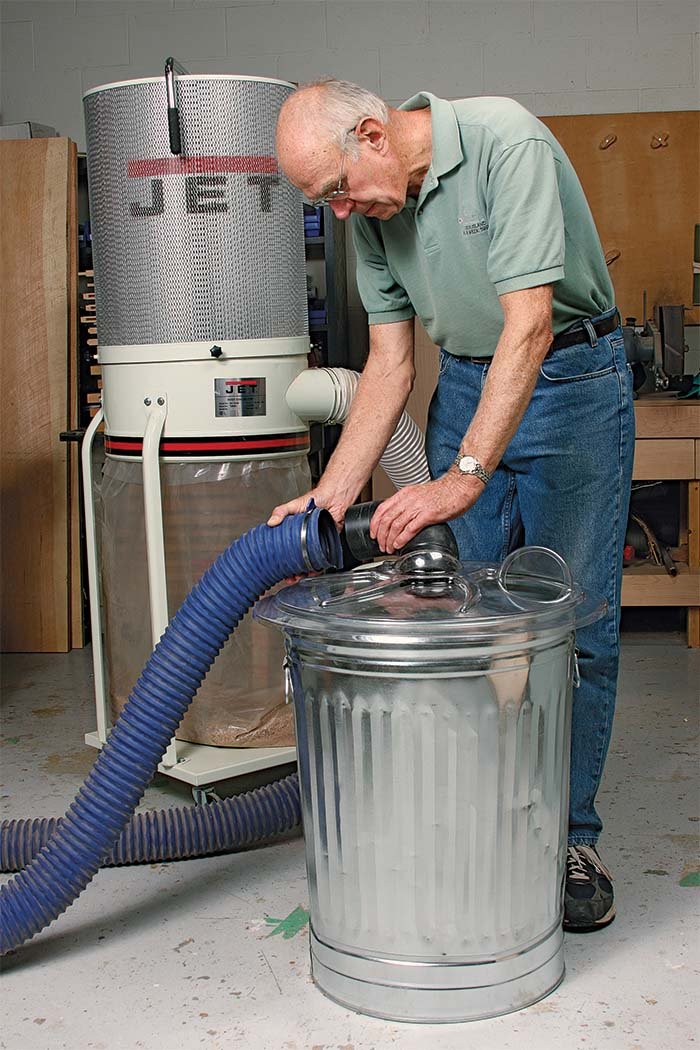
A single stage dust collector is pretty close to a traditional vacuum cleaner: a blower motor creates suction which brings the particulate-laden air into a single canister which acts as both the air filter and the collector for the dust. A two stage system leverages a vortex to create air speeds that force the heavier particulates out of the airstream before the air reaches the filter - there are two stages of dust removal, the coarser falling out at the cyclone, and finer being caught by the filter.
Two stage systems can be purchased “off the shelf”, custom designed by a manufacturer (typical for very large installations), or customer-integrated from key components; if you’ve read other posts of mine such as this about integrating the components for a custom CNC, you’ll know that of course, I’ll be pursuing a customer built design!
I have a good 2HP motor with an impeller in great shape & a solid housing, so I plan to use the Grizzly blower, mount it to a structural beam that runs across the middle of the workshop near the ceiling, and then buy all the two-stage parts I need from Oneida Air Systems to complete the transformation:
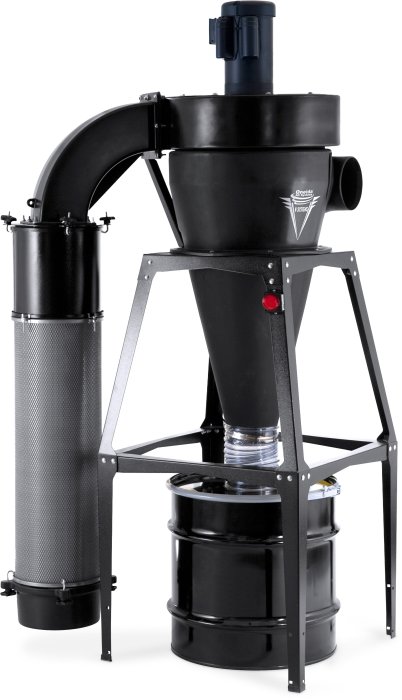
Cylone - Oneida Super Dust Deputy XL: $240 - this can connect directly to the to-be vertically-mounted blower, and discharge shavings into a drum below, and air into a HEPA filter.
Filter - Oneida HEPA stacked filter kit: $1009 - 155 square feet of pleated HEPA-grade filter, compared to 15.6 sf of fabric filter in the old system).
Drum - 55 Gallon Drum Kit: $250 - I probably should have gotten the 30 gallon drum instead as it would be easier to empty, but I figured this system will not pack the shavings as tightly as the single stage system, so 55 gallons in two-stage might be similar to 40 gallon in my prior single-stage setup.
Though already expensive in aggregate ($1750 with shipping), it turns out there was a whole lot more that I needed.
Pipe & Fittings

Spiral duct on the right is much more expensive than the snap fit duct on the left (roughly $110 from Oneida for spiral, vs. $30 from Lowes, for 6” diameter 10’), but spiral is much better at standing up to the static pressure of a vacuum system, whereas the snap fit could collapse in on itself.
The system I had built several years ago was fitted predominantly with 4” PVC pipes to all the equipment. At the 4” size, spiral metal ducts is about the same price as PVC, but much easier to work with (cut with chop saw vs. angle grinder, no sharp edges, buy at big box stores vs. online / specialty stores, etc.), so I had made the decision to use PVC for the main line & joints, and then to use these fittings to transition to blast gates and flex hose for the last few feet to the equipment.
That cost parity between PVC and spiral ducting disappears at 6”, and most of the convenience factors of 4” PVC also fall apart at 6”:

Dust Right adaptor from Rockler that goes between PVC and flexible hose or metal ducting; available for 4”, but not 6”.
There is not as much flexibility / range in what joints are available for purchase
The joints that are available are far more expensive, and rarely available locally, even at specialty stores
My 12” chop saw cannot cut all the way through a 6” pipe
The transition from PVC to duct work - made easy due to the availability of an adapter for 4” PVC pipe - is not available off-the-shelf for 6”
Knowing what I know now, I would have taken the 6” line from the blower and used metal ducting for all the new 6” lines, and spliced that via a reducer to the existing 4” PVC to the rest of the equipment. However, I continued working with PVC for the additional drop for the planer:
Sch 40 PVC 6” pipe 10’ long: $110 from Ace Hardware; I’m pretty sure I was the beneficiary of a pricing error on their part; all other sources had it north of $250
From GetPipe.com:
6” Double Wye: $90
6” 45° Street Elbow (x2): $77
6” Bushings to 4” (x2): $29
Long sweep 1/4 bend: $59
Clear 6” PVC 18” long: $89 from Amazon; my prior setup allowed the dust collector to be easily separated so clogs could be removed, but this is harder to do with the new configuration so this clear section allows me to see that dust is moving for the largest producer of debris.
Rubber PVC pipe splices (x2): $34 from Grainger
Rubber ductwork pipe splices (x4): $44 from Amazon
Beyond these costs for 6” PVC-related components, there was also:
Flanges (x2): $24 from SupplyHouse.com; this allows hoses to be connected to the cyclone & drum.
6” hose (5’): $33 from Oneida to connect the drum to the vortex
160mm hose: $46 from Felder to connect the planer to the blast gate
6” blast gate: $33 from Oneida Air Systems
Drum dolly: $40 from Amazon
8” to 5” duct reducer: $40 from Home Depot; Oneida has an 8”-6” and then a 6-5”, but the combined length was too great to fit in the space.
Add in shipping for all these parts, and a few other non-returnable components I picked up in trying to get the system working (an additional short sweep 90°; different flanges for the cyclone & drum; different adapters to attempt the transition between PVC and duct), and that’s another roughly $800, bringing the total system cost to about $2600. And I already had the blower motor and the remote control!
Granted, this is comparable to fully integrated new system, and I had some additional requirements - both Oneida Air and Grizzly have integrated systems for $3500 (although I still would have needed most of that additional ducting to integrate into my current system):

Grizzly G0440HEP: 2HP, 35 gallon drum, 96sf HEPA filter surface area, with remote
Oneida Air XXVM001500: 1.5HP, 35 gallon drum, 95sf HEPA filter surface area, with remote
… and compared to these off-the-shelf systems, I got 57% more drum capacity, 62% more filter surface area (to support higher CFM). And most importantly, my system squeezes into the space between the ceiling-mounted CNC and the wall, albeit I had to rearrange some of the pegboard and cabling that was already in that space.
Still, buying an integrated system would have saved me time and frustration, as a lot of the different pipe types are sized nominally, so a 6” PVC pipe does not work with a 6” flexible duct or 6” coupler. Ultimately, I had to use a heat gun on some of the rubber fittings to get them to slip over pipes, and a few shop-built / shop-modified fittings in other places
Performance

Suggested minimum airflow requirements from Wood Magazine; additionally, For systems carrying woodshop dust and chips, engineers recommend minimum air velocity of 4,000 FPM in branch lines and 3,500 FPM in the main duct to ensure that dust and chips will remain in suspension as the air flows through the system.
After about a month of gathering parts, I finally have everything in place to put it all together. The hardest part was hoisting the 2HP blower motor up to the ceiling - it was probably about 80-90#, and so I needed to find a way to hold it in place while I was drilling and tightening the bolts. A portable table on top of a folding table, with a few extra 2x6 cutoffs as spacers, did the trick.
Unfortunately, I neglected to measure the airflow at all of the dust ports prior to disassembling the old system, but I did get about 600 CFM at the hose that then went into the bandsaw, which was the machine closest to the original dust collector. With the new setup:
Felder planer (6” ducting): 1080 CFM / 5500 FPM
Bandsaw (4” ducting, split into two 4” ports): 380 CFM / 4400 FPM
6” Belt Sander / Oscillating Spindle Sanders (4” ducting): 470 CFM / 5400 FPM
Table saw (4” ducting): 689 CFM / 7900 FPM
DeWalt planer (4” ducting, connected to 2.5” port into planer): 250 CFM / 7400 FPM
Interestingly, the original DeWalt planer, which has the highest airflow demand and is located farthest away from the vacuum motor, has the lowest CFM, but that’s due to the relatively small port coming out of the planer (2.5”); I’ve never had clogs from the planer, perhaps also aided by the fact that the planer has a blower to assist chip ejection. Also, the bandsaw CFM is lower than previously measured, though my original 600 CFM measurement was at the hose that fed into the bandsaw wye junction, not post split at the point of hose entry into the tool itself. And the bandsaw moved: previously it had only about 5’ of flexible ducting between the dust collector and it; now it has 14’ and two 90° bends of 4” PVC and 7’ of flexible 4” hose. Still, this might be an area I’ll need to further refine once I have some practical experience with how this performs.

Best overview picture of the dust collection system with the CNC up and out of the way.
There’s about 26” between the side of the CNC table and the wall, and the drum uses pretty much all of that!
The filter canister leaves a couple extra inches of space - but that and the cyclone took up a lot of useable pegboard space, so I had to add pegboard elsewhere in the shop for all the handtools.
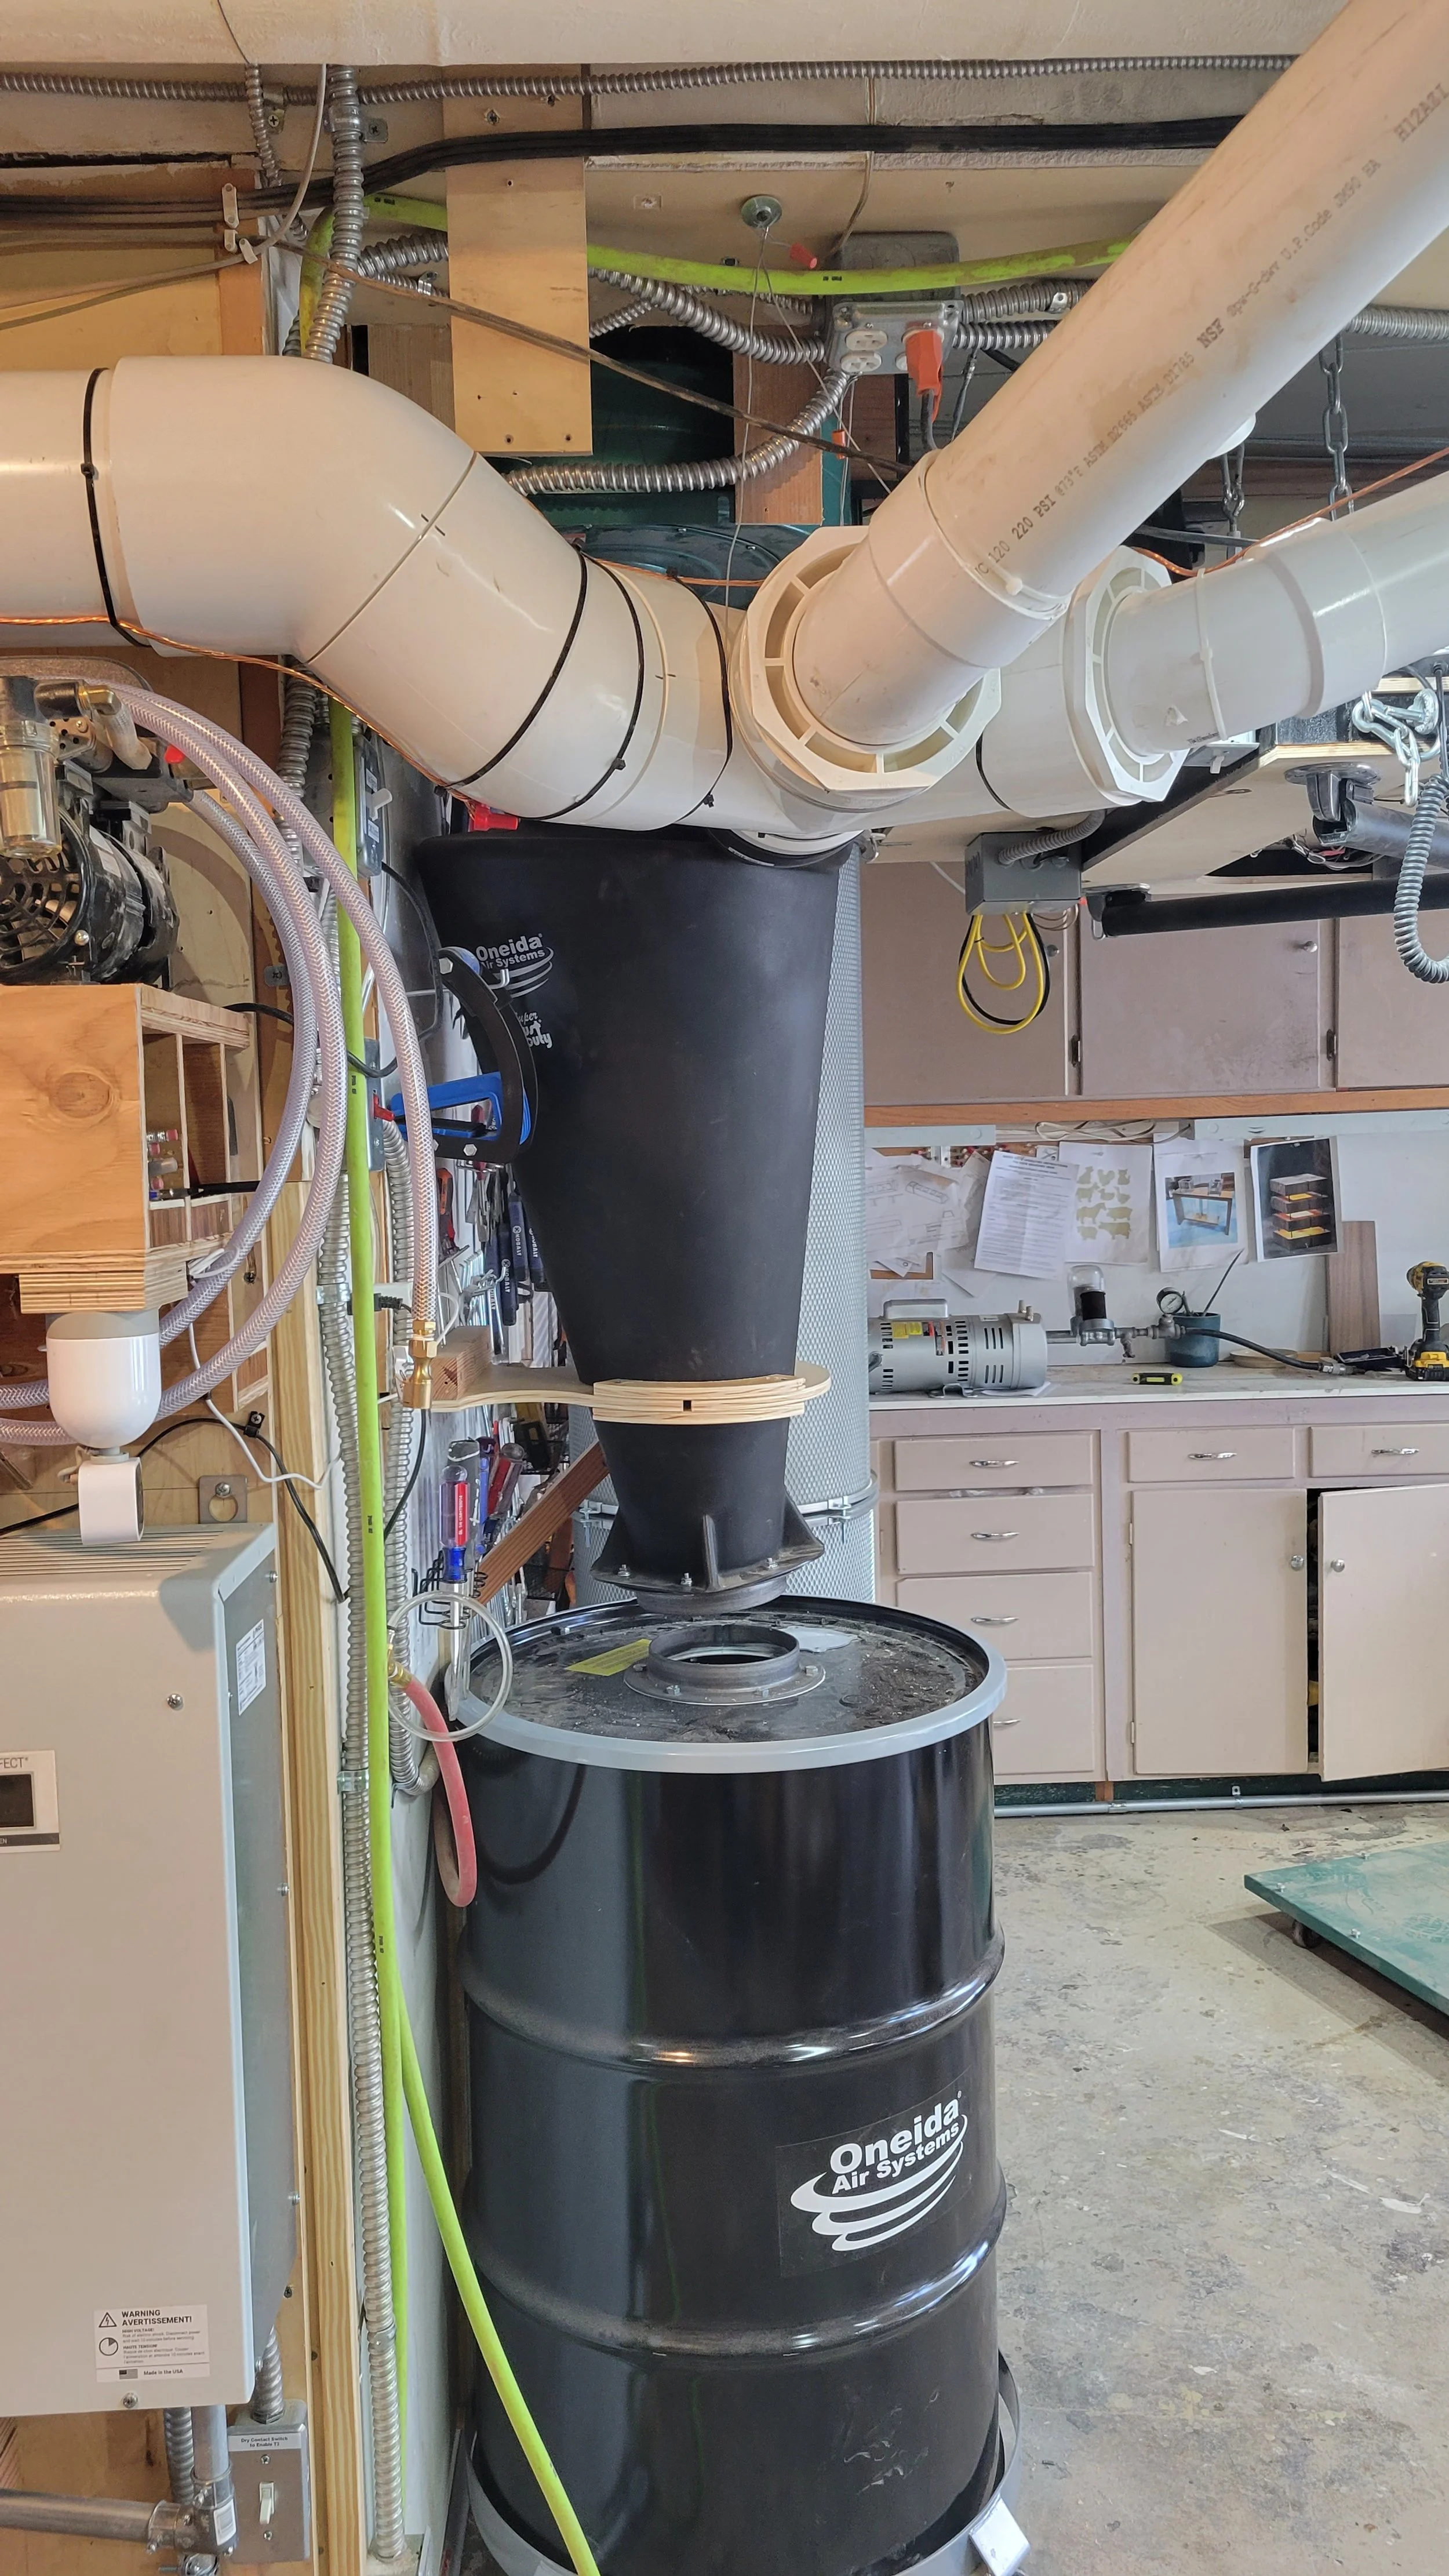
The 6” wye fitting coming out of the cyclone connects to: 6” 45° street fittings for the planer on the left; a 4” bushing reducer to a 45° street fitting for the band saw in the middle; and a 4” bushing reducer to a 45° street fitting for everything else (table saw, sanders, old planer, CNC dust shoe) on the right.

The rest of the new dust collection setup includes another 45° street fitting, a 90° long sweep, some clear PVC for troubleshooting, and a shop-built connection between the PVC clamp and the blast gate.
One huge gain I’ve noticed is that the air around the filter canister is indeed breathable, unlike the air coming out of the prior Grizzly filter bag. So I’m cautiously optimistic that, in addition to opening up a bit more space in the shop for the planer that this will help keep the shop air clean and breathable.