
After nearly three years of use, I am in the process of upgrading my CNC X-Carve to a much better new machine. This is the first of a four-part mini-series about that process and the replacement machine:
Part I: My goals and requirements and how those relate to the limitations of the X-Carve.
Part II: The components I selected to build out the new machine.
Part III: The process of putting all those components together.
Part IV: Revisiting an earlier post on 5-axis machining, finally bringing the promise described there to fruition.
Without further ado, let’s drill into those goals and requirements in this first post.
More Accurate Cuts
Stiffer Frame
The aluminum frame of the X-Carve is not all that rigid given its large work area; the spindle acts as a lever arm twisting the x-axis when doing a plunge cut; and the y-axes deflect slightly under load, limiting the precision of my cuts, especially for cuts where I need to use the full work area. There are some axes-stiffening upgrades I could have done, but that would not help in all the places.
Though a partial mitigation for some of this is just to cut more slowly, there are a few things that I’ve just been unable to well, or at all, with the current frame, such as to mill aluminum, or to engrave brass.
Flatter Work Surface

Without manually shimming these doors prior to running the job - which took as long to set up as the actual cutting job - my skimming off of 1/40th of an inch from the circles would have been too deep in some locations and too shallow in others.
My CNC hangs from the ceiling, lifted out of the way when not in use. However, the steel frame on which the CNC is placed has a noticeable bow in it, which is transferred to the X-Carves x-axis.
That means that when cutting out a large profile, I have to design the tool path so that it plunges an extra 1/16” past the bottom of the material to make sure that the cut goes all the way through. And in milling a very shallow or detailed design into a large surface like cutting the cavities for the veneer pieces of these doors, I have to take care to shim the workpiece to keep it parallel to the x-axis over it’s entire surface.
This is not an X-Carve limitation, but a problem of the steel frame on which my X-Carve is installed.
Error Prone Drive System
Perhaps the greatest weakness of the X-Carve - but a design choice that also makes it affordable as an entry-level machine - is how the x- and y-axes move. They are belt-driven via open loop stepper motors, rather than direct drive / closed loop, which has a few implications: the belt or motor can slip, stretch, and be a source of backlash, albeit these can be somewhat mitigated by periodic belt adjustments or via a belt and pulley upgrade.
Additionally, the axes move on carriages with wheels that slide over a track that, even with a dust collection system running, still accumulates some sawdust that leads to imprecisions in z-axis position. I’ve upgraded the z-axis movements to eliminate this and other problem, but the x- and y-axis would be a much more involved upgrade.
Cut Large Jobs More Quickly
Both personal projects, like in these stair treads, and commissioned projects, like these oval mirror frames, require removing a lot of material; these and other similar jobs take hours per piece as the X-Carve does not have a lot of power, typically skimming off just a 1/16th of an inch at a time from the workpiece.
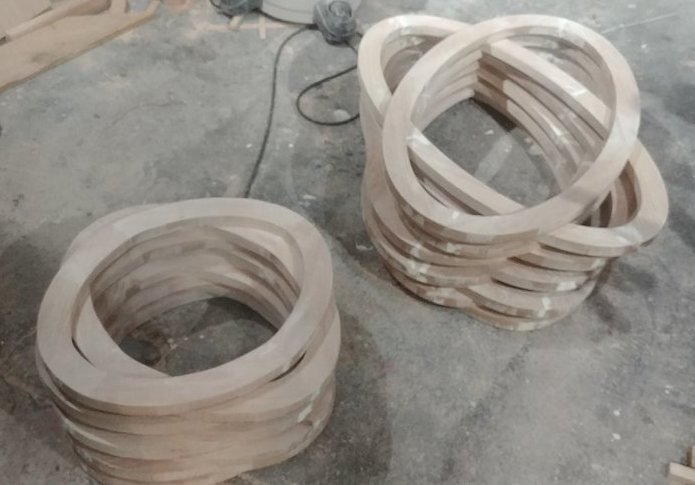
Each of 48 pieces took about 25 minutes to cut for nearly 24 hours of non-stop CNCing on my X-Carve.

Similarly, the 50+ treads in this project took about one work day of carving time.
Stronger Drive Motors
Rather than go into all the math about the limitations of the X-Carve motors, the short of it is that they really have sufficient power for shallow cuts only at low speeds. This earlier post provides an example of how a commission that took 9+ hours to cut could have been done in 30-ish minutes instead if only the drive motors (and the spindle) were faster and stronger.
I could get some of the way there driving the existing motors with a higher voltage, but the controller that came with the machine does not support a higher voltage. So to leverage an upgrade to stronger drive motors, I would need a new controller, power supply, and motor drivers.
Bigger Tooling

Some shapes and types of bits are only available with larger shanks that would not fit in the X-Carve’s DeWalt spindle.
Beyond the higher material removal rates that bigger tooling enables, there are a number of other advantages tools with larger diameter shanks enable as well. First, finishing passes could be done both more quickly and yielding a higher quality finish that does not show “scalloping”. Also, some tools profiles and types are only available with larger diameter shafts, such as a CNC probe or a surfacing cutter.
More Powerful Spindle
This goes hand-in-hand with bigger tooling, but in order to cut more deeply into wood, or to mill aluminum, I need at least a 2HP spindle (vs. the X-Carve’s 1-1/4 HP motor). Of course, a more powerful spindle would also be heavier, so it’s not an upgrade I can do with the existing frame because of stiffness / lever action issues mentioned earlier.
Automated Speed Control
Different bits require different speeds, and in some cases, even the same bit should be operated at different speeds depending on how much of the bit is exposed, for plunging vs. cutting, for roughing passes vs. finishing, and so on. So I would like to be able to specify the spindle speed as part of the machine code, rather than to have to babysit the machine, potentially fumbling with speed charts and coarse settings when the machine is in operation.
Cut More Complicated Jobs
Tool Changing

Not only would an ATC have created the final product more quickly - the rounded outer edge, for example, could have been cut in one pass with a cove cutter rather than over an hour with an 1/8” bull-nose end mill - but the design itself was a compromise reflecting the machine limitations. For instance, the client had desired “sharper” points for the recessed areas than I was able to deliver with one “average” bit.
Complicated jobs typically require multiple tools to carve. Some parts of a design may require large material removal, while others parts have a lot of detail work. Or beyond size, a design might require different shaped tools, such as if there is both material removal and engraving. However, tool changes in the middle of a job are difficult with the X-Carve due to my need to “babysit” the job waiting for a coming tool change, and because changing the tool introduces some potential error as the torque from the collet wrench potentially shifts the spindle position.
So I tend to design around a tool change, whenever possible, by using the smallest bit that can accomplish all or almost of what is needed; this leads to a much slower carve, of course. Ideally, I’d like to have an automatic tool changer that can easily swap between a number of pre-loaded tools.
Dedicated Controller
Currently, my laptop - via a program called Universal GCode Sender, or UGC - connects to the X-Carve controller to drive the CNC. This is fine for some types of jobs, where I like to be able to tweak and modify the design as I go. But more often, I want to be able to leave my laptop in a dust-free environment, or to be able to start the CNC and then go work on my laptop in another room - this is particularly relevant for long complicated jobs.
If this were my most pressing issue, I could have followed one of a few online tutorials for inexpensive Raspberry Pi-based solutions that you can hook up to the X-Controller to eliminate the need for a laptop to be nearby.
Multi-Axis Capability
As described in this earlier post, I’d like to be able to do 4-axis and 5-axis machining. I had purchased an inexpensive knockoff Mach3 controller to attempt to do that with some add-on hardware to my current system, but the limited documentation - and perhaps bugs - that came with that controller prevented me from getting much past the electronics testing phase in mid-2019.

The Mach3 controller I purchased from China. My challenges in configuring it or simulating simple jobs on it given the limited documentation discouraged me from investing more money or time in attempting to replace the X-Carve controller with this system.
Machine Size
Weight
The entire machine is on a vertical lift with a weight and headroom limit. Though I’m open to upgrading the lift from it’s current limit of 225# (which would also address some balancing issues described here) to allow perhaps 500# hoisted into the air, anything over that - including the frame, waste board, etc. - would start to make me feel uncomfortable as I work on projects underneath it!
Depth
Similarly, since the machine is hoisted into an 8’4” tall ceiling, the entire thing cannot be thicker than about 24”, so that I can work and walk underneath it without worrying about repeatedly bumping my head on low-hanging components.
Work Area
The 1000mm X-Carve has a work envelope of 750mm x 750mm - roughly 30” square. While that’s more than enough on the y-axis, I’d love to expand the x-axis to 48” to allow for a full width of a sheet of plywood, both so I can cut larger shapes, and so that some of that cutting can be done without having to cut down a plywood sheet manually first.
Budget
My original X-Carve cost about $2,600 including a few upgrades to give greater z-axis capabilities. I’m open to spending about $10,000 for the new machine, albeit even the smallest of prosumer 5-axis machines come close to breaking that limit, yet without the strength or rigidity to work with hardwoods, nor the size to tackle most of my past projects.
New CNC in the Cards…
While a few of these individual requirements could be partially or even wholly met with one-off modest upgrades to my current system, some would have required whole-scale reengineering, and many just could not be accomplished whatsoever. So, it was time to look at a new system!
The weight & size limitations, together with the budget goal, led me down the path of assembling my own machine from engineered subsystems. Up in the next episode: my (virtual) shopping trip around the world.
… and a New Home for the Old CNC

The prior machine still has a lot of life left in it, and fortunately it found a new home with a Monterey-based escape room proprietor (Mission57; @mission_57) & puzzle creator Karmisha Jawell (@misha2ohh). Hopefully, she’ll be able to take advantage of the laser engraver that I had also purchased but never used in my overly-dusty workshop, and I am excited to see what unique creations she comes up as the X-Carve gets its second life.