
In response to a pair of questions that often comes up at the shows, I used last week's post to share some detail about the Edison bulbs I use in most of my lamps, and I'll use this and the next post to give a little tour of my shop.
I had originally planned to do this "shop tour" post in combination with a product offering to take a hands on class, or to build your own lamp. But my good friend and lawyer - whose former professional job it was to say "no" as a pharmaceutical compliance counsel - repeated that mantra of "no" when I posed the idea to him.
So you'll just have to follow me around on a virtual tour. This week, I'll touch on the "big" floor standing tools; next week, I'll cover smaller tools, ventilation, lighting, and other random shop investments.
Big Tools
We'll go roughly in sequence of my favorite and most used tools to those that I infrequently touch or are just taking up space!
Planer
Also called a surfacer or power planer, this takes off a thin layer - up to about 1/8" depending on the width and hardness of the wood. I use it to make a near-mirror smooth surface on the raw lumber I start with, since the raw dimensioned lumber starts very rough.
The model I have is a 13" wide DeWalt DW735 planer which has been a workhouse over the years, but from time to time I wish I had something a little larger as I work with wider or longer boards.
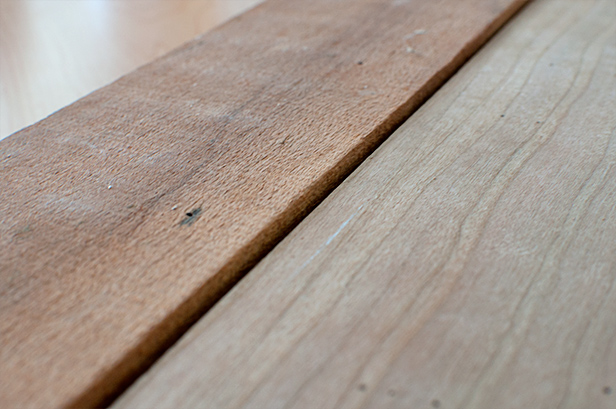
Raw dimenionsed lumber before (on the left) and after (on the right) going through a surface planer.
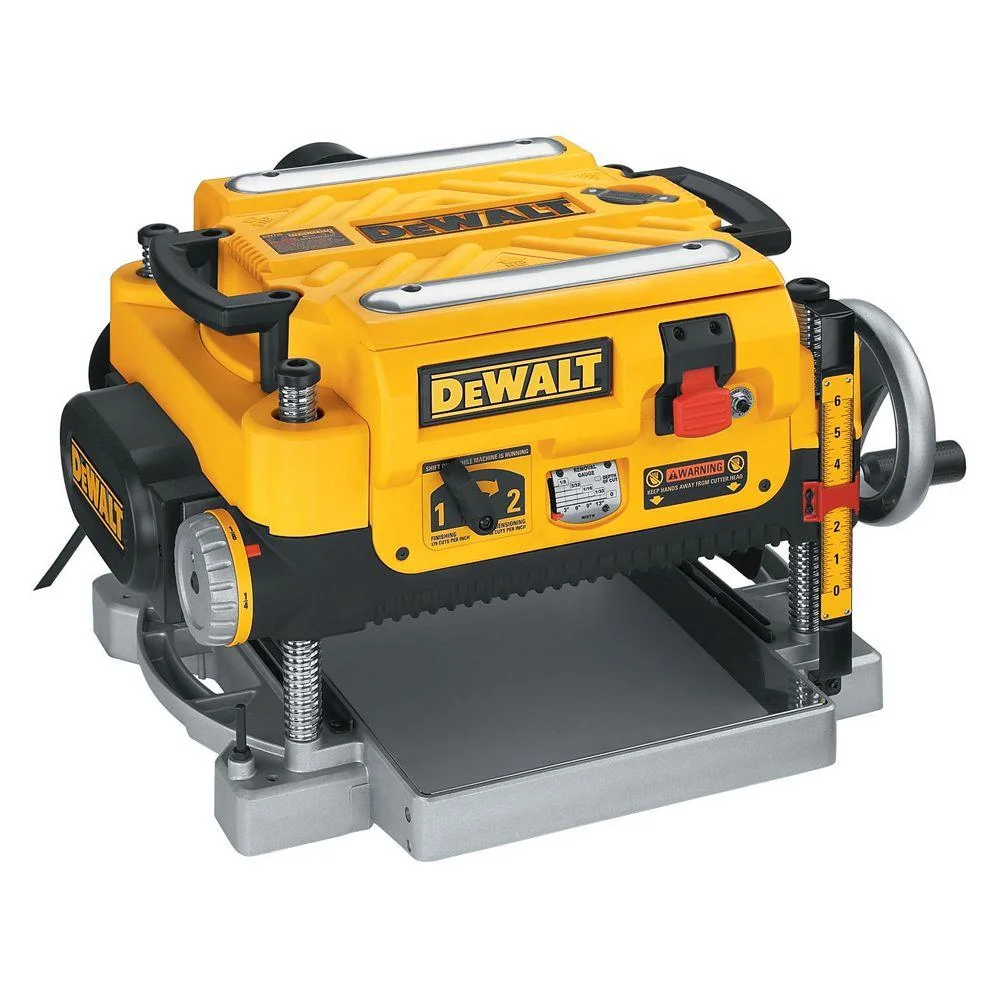
The DeWalt DW735 13" wide surface planer I use.
Table Saw
This is also a workhorse in my (or any) shop, and it was the first big tool I purchased after building my first piece of furniture using a junky $99 table saw that bogged down with the smallest pieces of hardwood. In contrast to that, the Grizzly (G1023SLWX) saw I replaced it with is over five hundred pounds, with a 5 HP motor on a 30A / 240V circuit!
This "rips" 3" maple or "dados" a 1" wide by 1" high channel, all without breaking a sweat, and save for an occasional blade sharpening or screw tightening, it has not provided a single problem. Just like the planer, I occasionally wish for a larger saw, but here it's more about the infeed and outfeed tables to make working with large boards a lot easier.

Rip cut is cutting along the grain, like on the left; cross cut is cutting across the grain, like on the right. They require different blades and types of fences, though some blades are "combination" blades good for both.

Belt / Disc Sander
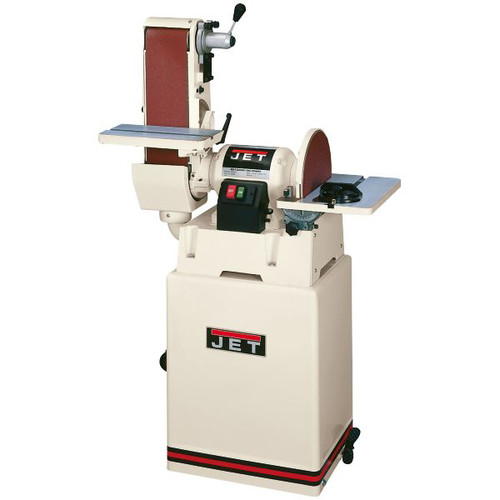
Though there's still a lot of sanding done by hand, no shop would be complete without some sort of belt sander to ease the tedious but ever-so-critical finishing stages. This combination belt sander and disc sander (JET 708598K) is great for that purpose, but it throws off a ton of dust so I've attached it (and every other big tool) to a dust collection system I'll describe later.
The disc has fairly coarse sand paper attached semi-permanently, so it's great for taking off a lot of material quickly. On the other hand, the belt allows you to swap in any grit paper you want, and I frequently find myself working with three or four grits in a session (100 all the way to 400 for fine polishing).
One challenge with a belt sander and hardwoods, however, is that many of the hardwoods are so hard that they burn easily with too fine a grit or too much pressure, so you always need to be fine tuning and adjusting.
Drill Press
Though I had a much smaller drill press for many years, drilling out the holes for the sockets was incredibly challenging with such a short vertical "travel" (and a smaller motor). So my most recent addition - and one tool I cannot imagine outgrowing for many years - is the hefty Nova Voyager 18" drill press. Weighing in at over three hundred pounds, and with a six inch travel and two horsepower motor, it can easily do the dozens of 1-1/2" wide 2" deep holes I drill regularly for the lamps.
It is a rather unique drill press, with a variable speed direct drive motor, without any belts typical of drill presses to slip, create vibration, or swap around as you need to change speeds. In fact, it has a speed chart built into it so that you can simply indicate the bit type and size, and the material you're drilling into, and it selects the right speed, from 50 RPM to 3000 RPM.
Speed is really important so as to not burn the wood, to make clean cuts, and to not prematurely dull the drill bits. And as for those drill bits, I typically use "Forstner" bits to cut the 1-1/2" to 3" holes for the lamps, backlights, and vases.

Nova Voyager DVR drill press

Forstner bits produce very smooth-walled and flat-bottomed holes
Band Saw
I use the band saw for two types of sawing: cutting out unique, curvy, intricate shapes, and "resawing" thicker boards into thinner boards. The first type of cut is something I think most folks who know of bandsaws are familiar with, allowing you to create the traditional "bandsaw box" among many other complicated pieces.

Bandsaw box I made of solid wenge a few years ago.
Resawing is another bandsaw technique that allows me to create, for instance, the thin 1/8" bottoms for the backlights without wasting a lot of other wood, or slimming down a board of walnut into two planks for a more delicate hexagonal lamp. Like with the table saw, however, the challenge in my shop in running a long board through the bandsaw is the support for the board beyond the comparatively smaller table - I need a bigger machine, or at least a bigger table!

Typical resaw technique with a standard bandsaw.

The G0513 Grizzly Bandsaw that I use, with a 17" throat.
Router Table
A router table allows you to run a straight edge of a wood up against a uniquely-shaped bit, to create slots, grooves, and other neat patterns into the wood. I've used it to cut the channel to hold photos in this shelf, as well as the grooves that make this art so unique. And, of course, for wiring channels in the underside of these Edison blocks.
Three-Spindle Shaper
In building my first custom cabinet using "rail and stile" bits, I discovered the motivation for this three-spindle shaper (or essentially, a three router spindle router table).
Depending on the door frame style, there are at least two and sometimes three bits that all need to be perfectly aligned in order to create a door, and it's quite tedious to check the alignment of one bit without being able to simultaneously cut with the second or third bit. Of course, changing between bits to make just one more face, or to verify alignment only means that you have to then realign the first bit again!


However, I was not prepared the drop over $5k or add a 1200 pound tool to the already-crowded shop. But on one of my too-frequent perusals of the Craigslist used tools section, I stumbled across someone closing down his custom cabinetry shop, who had built a three router table modeled after the Grizzly version. It was missing a few fences and a few motors, but with some patient shopping on eBay, I got it fully outfitted with matching Freud fences, Porter Cable spindles, and variable speed controls, and I inserted a few channels for easy use.

Oscillating Spindle Sander
Now we're getting on to tools I've been using less frequently. The oscillating spindle sander is great for sanding curves, and in particular, inside curves, with a dozen or so interchangeable drum sizes (and with a range of grits available for each drum. However, at least as of present, there aren't too many curves in my pieces, so it's largely been sitting idle waiting for a purpose!

Jointer
Finally, my jointer gets very little use; it's kind of like an open-face surface planer described above, allowing you to run the edges of a board over the spinning blade to clean up that edge. But I use it infrequently because the same effect can be produced more safely and easily, with higher quality results, using a ripping blade on a table saw.
This may also be a good place to introduce some terminology that you may have heard buying raw lumber yourselves; excerpted from this site:
The SxS designation simply refers to how many sides have been pre-surfaced. S2S= surfaced two sides, S3S = surfaced three sides and S4S = surfaced four sides.
S2S – The board has been run through a planer producing two flat faces, but the edges are left rough.
S3S – The board has been surfaced S2S first, then one edge is ripped straight (also known as SLR1E or straight line ripped one edge).
S4S – The board has been surfaced on both faces (S2S) and received a rip on both edges, resulting in a board with two flat and parallel faces and two flat and parallel edges. This is the stuff you usually find for sale in the hardwood section of the big box stores like Home Depot and Lowes.
To be continued...
There's just too much stuff to list in one week! The next post will detail all the other stuff that goes into a shop beyond the big 500 pound tools.