
Probably the last for a while in new workshop highlights, as - while there's always more or larger equipment to add - my shop is essentially out of space! Every wall has either tools hanging or a large machine pushed up against up; even all the ceiling space is claimed, between wood storage, a platform for my CNC, and air handling equipment!
Finding space to build those large commissions or occasional kitchen cabinet jobs that come in is a battle, so unless, or until, I move to a larger shop, pretty much any major tool that comes in will be only to replace something going out!
CNC Milling and Laser Carver
One of the things I've been eyeing for a while is a CNC carver. However, very few of my current designs would benefit from it, and part of me feels like it's "cheating" to use a machine to do the cutting and carving for you.
However, I was finally won over by the realization that it actually opens up a lot more capabilities, rather than replacing what I currently do "by hand". And even more specifically and immediately, by my need to make a clock "body" from the solid block of wood that I hope to start with for the Nixie clocks I've been working on.
Let me back up first: what is a CNC Mill, often just CNC for short? CNC stands for "computer numerical control" - imagine a wood cutting head that can move left and right, forward and backward, and up & down with incredible precision. That would be a three-axis (x, y, and z) milling CNC. That wood cutting head is typically a router, into which you can place different size and style carving tools. Or if you replace that router with a laser, you have a CNC laser, great for cutting more delicate materials or doing light engraving.
3-axis vs. more axes machines? For the technogeeks among us, the more axes, the more degrees of freedom over which the machine can move to carve your item. 3-axis machines let you cut and carve two dimension objects, as well as what are called "2.5d" - basically, by using a cutting head that always points straight down, you can cut really complex shapes, so long as all the pockets can be reached from straight above. As soon as you want to cut pockets that can only be accessed from the side, or another angle, you need more axes.
A 3-axis machine can also typically be modified so that one of those axis becomes rotational, making it essentially a computer controlled lathe, opening up even more possibilities such as carving 3d faces or columns, but still not quite true 4d or 5d geometries. This is a great article describing all the different axes, or these pictures may help you visualize.

3-axis CNC mill can do the design on left, but cannot reach the "undercuts" in the geometry on the right.
A CNC lathe, converted from a traditional 3-axis XYZ CNC.

This wood Transformer can only be done with a true 5-axis CNC; note the angle of the carving tool, which is a 4th axis.
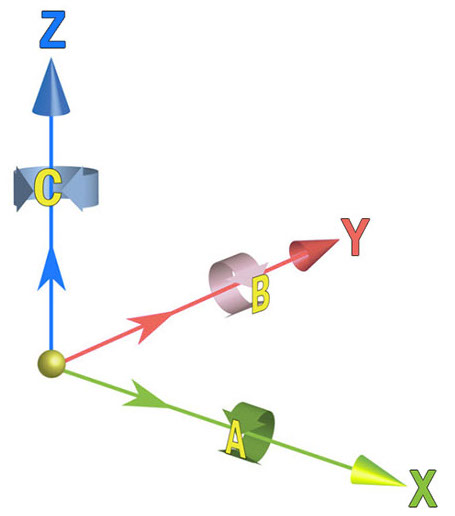
A three axis machine typically has X, Y & Z movement, but one of X, Y, or Z can often - with extra hardware - be converted to A, B, or C, giving you a - say - A, X & Z machine to do CNC lathe-like carvings.
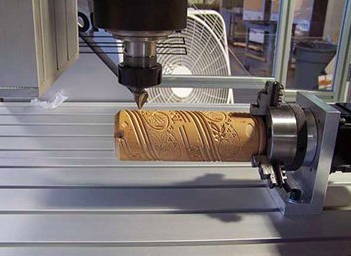
A 3-axis CNC can easily cost thousands (or tens or hundreds of thousands) for large commercial or industrial machines. But with the maker movement, consumer grade machines - especially for those willing to do some assembly and configuration themselves - have recently become affordable. So I added an X-Carve 1000mm (about 3 feet square), with a removable Opt Lasers 6w laser, to my shop.
I'm still in the process of setting it up; though the machine itself has been built for nearly a month, I need to finish the torsion box, the automatic ballast for the ceiling lift, and the laser power supply, which I'll detail in future blog entries.
But here it is, in all it's glory! This is mounted on a retractable ceiling lift so it can easily get out of the way. But that lift has only two cables - one in the middle of the left and the right sides, rather than one in each corner - so I also need to build in a balancing mechanism so that the platform doesn't tip too far to the front or back. Also, check out the silver brackets on either side that allow for a higher-than-normal gantry to carve extra-thick surfaces (2-6" deep); this also means I need to insert a perfectly flat and smooth spacer - or torsion box - for when I'm milling normal-depth surfaces (0-4" deep). In future entries, I'll talk about each of these, as well as the laser - see the laser mount on the left of the yellow DeWalt spindle in the middle.

In a future entry, I'll also provide some more detail about my first few milling projects, but here's a little preview of what I plan to carve out first.

Body for Nixie clock, to mill out of a solid walnut and maple
Miter-Fold Blade
This "miter fold" blade is really nifty, cutting a slotted V-groove in a board but not going all the way through, leaving just a tiny bit of wood remaining so that you can essentially just fold the wood to create a solid joint with a little glue.
While it allows me to make boxes really quickly from just a large flat single piece of wood that both allows for quicker construction and really cool and guaranteed continuity of grain over the joint, my more immediate use of it is to make an even better version of my simple shelves. I'll be trying out a few new designs here that now, which this blade, become much easier to make.

Miter fold blade profile...

... and blade output

One of the shelves that will benefit from the blade for the right angles

The other shelf that will benefit, ... but I also will be trying a few variations on this shelf which now become much easier with this blade
Compound Bevel Sliding Saw
Since I have such a nice table saw, I've never considered getting a radial arm saw for my woodworking. But I recently helped a friend with a small remodel that included cutting and installing crown molding, and suffice to say, that is a PITA to cut correctly by hand with nothing but a plastic miter box. Given that I'll be starting in on another remodel for myself soon, I figured I'd give in and get something to help with these construction projects, a compound bevel sliding saw.
While it's been great for those projects, I didn't expect it to be quite as handy in the shop for my wood working. But having had it for a few months now, I can't imagine how I got by without it! My table saw isn't that great for cutting a few feet off a long plank in that it requires me to push a 8 or 12 foot long board, weighing 30 - 80 pounds, through the blade, and it requires me to make sure there's enough clearance around the saw.
But with this new saw, it's always set up to cut across boards, and also much easier as the blade slides, rather than the wood. Plus, with a 12" blade - vs. the 10" I have on my table saw - I can tackle thicker boards and blocks, for instance, easily slicing down the 4" thick glue-up I made for a custom project.
